Welcome to the Instructor Guidelines
Course Info
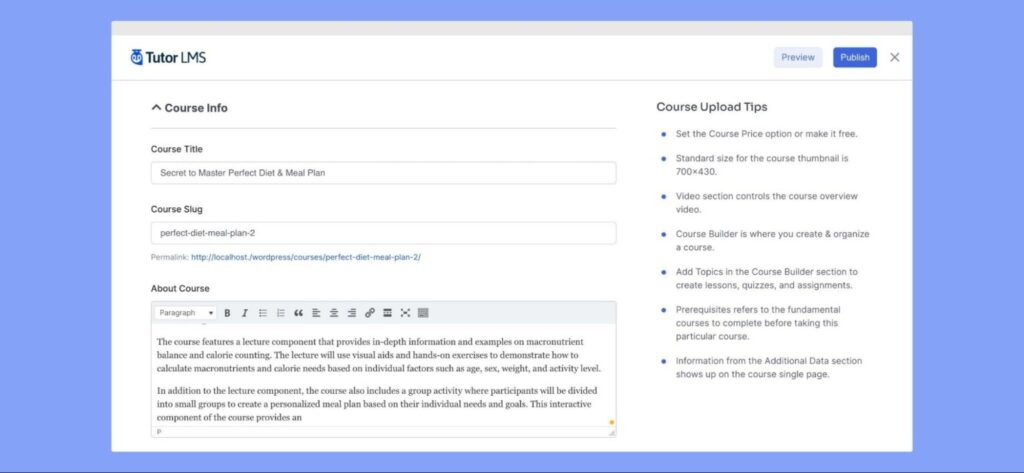
Let’s start with the “Course Info” section. In this section, you will find the following fields to complete:
Course Title: When creating your course, it is crucial to select an appropriate title. The title should accurately represent the course content, so aim for brevity and catchiness. Additionally, including relevant keywords in the title can enhance visibility.
Course Slug: In this section, you have the option to modify the Course Slug. The Course Slug appears in the URL after the final backslash. To improve your course’s visibility in search engine results, it is essential to ensure that the Course Slug is relevant, includes relevant keywords, and separates each word with hyphens.
About Course: Utilize this field to provide potential students with a general overview of what they can expect from the course. Describe the course content, learning objectives, and provide a brief summary of the syllabi.
Course Settings
You have the ability to update the fundamental course settings and content drip options within this section. Let’s provide an explanation for both of these.
General
In this section, you have the ability to customize certain attributes of your course.
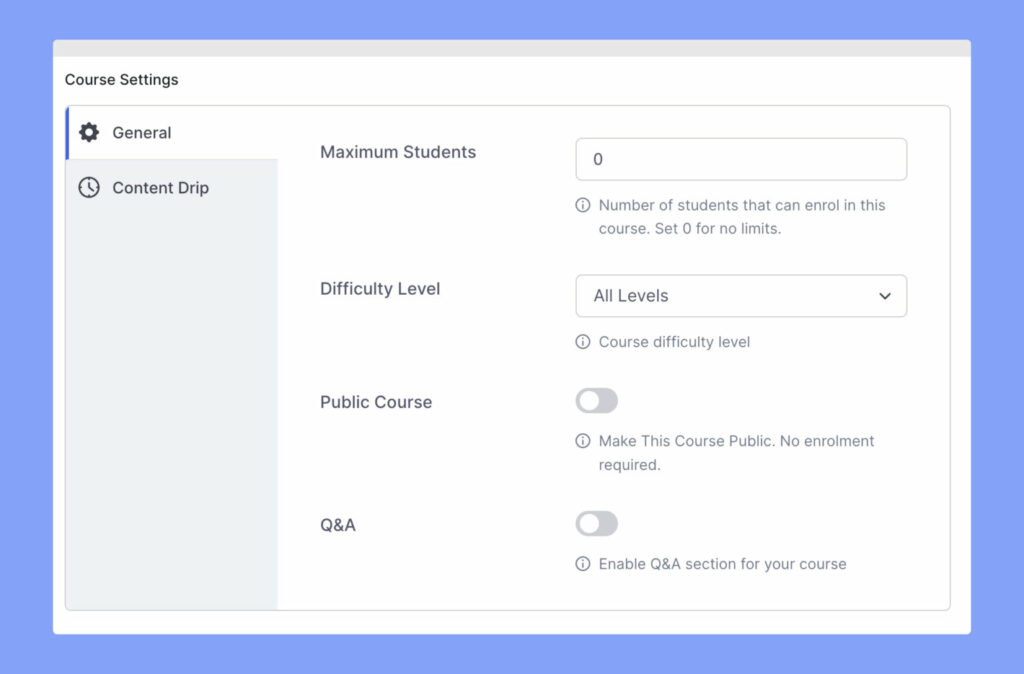
Maximum Student: This field enables the user to specify the maximum enrollment limit for a course. If the “Maximum Students” is set to 0, there will be no restriction on the number of students who can enroll in the course.
Difficulty Level: The difficulty level settings for course enrollment allow instructors to categorize the course into different levels of complexity, facilitating students in selecting the appropriate course based on their skill level. The four main levels are as follows:
All Levels: This option indicates that the course is suitable for students of all skill levels, ranging from beginners to experts.
Beginner: This option is intended for courses designed for students with minimal or no prior knowledge of the subject. These courses aim to provide a solid foundation for further study.
Intermediate: This option is for courses targeted at students who possess some knowledge of the subject and seek to deepen their understanding. These courses assume a basic understanding and build upon it.
Expert: This option is designed for courses tailored to students with advanced skills and extensive knowledge in the subject. These courses assume a high level of understanding and aim to challenge students and enhance their skills further.
Public Course: The Public Course option is a setting that makes an online course accessible to anyone for enrollment. It means that the course can be accessed by anyone who has the course page link, without requiring them to log in or have an account to view the course content.
Q&A: This option enables instructors to activate a Question and Answer section for the selected course.
Choose Course Category
The option “Choose Course Category” enables you to classify your online course into specific topics or areas of study. This assists in the organization and grouping of similar courses, simplifying the search process for students and helping them find courses that align with their requirements more easily.

Set Course Price
The “Set Course Price” section allows you to choose whether the course will be free or paid.

If the course is paid, you have the option to set both a regular price and a discounted price. This section allows you to determine the cost for enrolment in the course.
Set Course Thumbnail
In the “Set Course Thumbnail” section, course creators can incorporate a primary image or visual representation that represents the course. This image will be displayed on course listings, promotional materials, and other pertinent pages. The purpose of the thumbnail is to enhance the visual appeal of the course and provide prospective students with a glimpse of what the course entails.

Course Intro Video
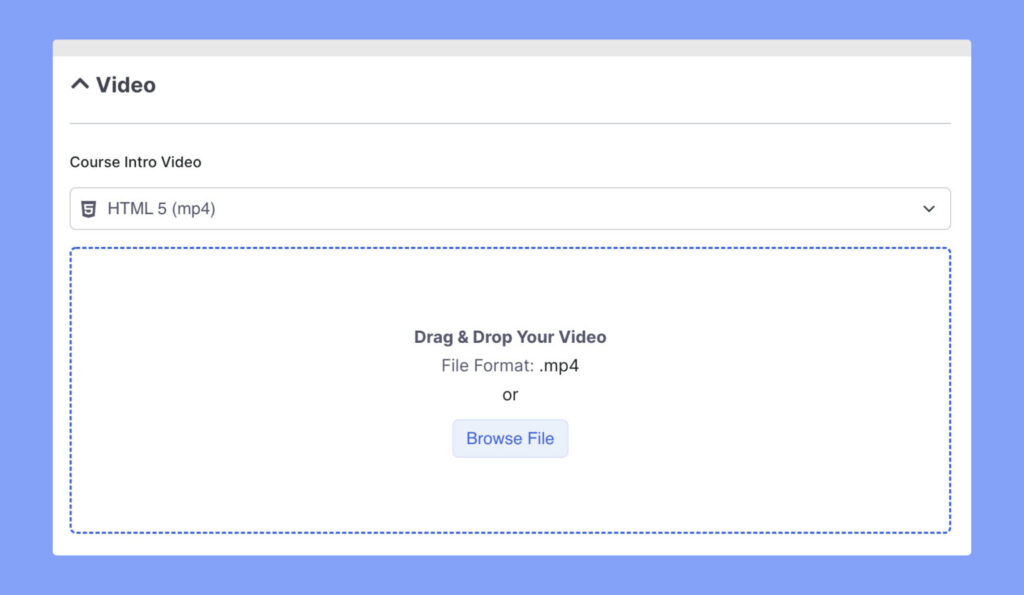
The “Course Intro Video” section allows you to add a video introduction to your online course that will appear on the Course Overview Page. You can choose from multiple video sources, such as HTML5, External URL, YouTube, Vimeo, Embedded, or Shortcode, to include the video in your course.
Course Builder
The “Course Builder” is the core feature of VDR4U, serving as the foundation for creating and structuring course content.
It offers a user-friendly interface for managing course content, allowing you to add, edit, and organize topics, lessons, and quizzes. Additionally, you can utilize this section to personalize essential course details, such as information, settings, and attachments.
This section empowers instructors or administrators to effortlessly construct the framework and content of an online course, making it accessible for students to enroll and participate.
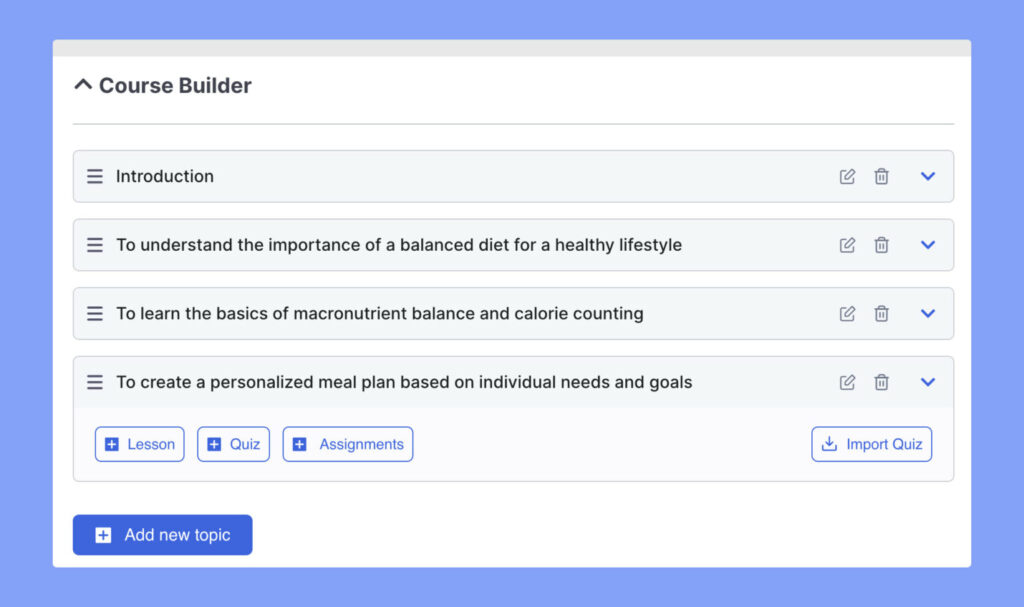
Within VDR4U, a course is structured using topics, each containing lessons, quizzes, and assignments. While it is possible to include multiple lessons and quizzes within a single topic, it is advisable to maintain a recommended range of 2 to 5 lessons and one quiz per topic for optimal outcomes.
Add New Topic
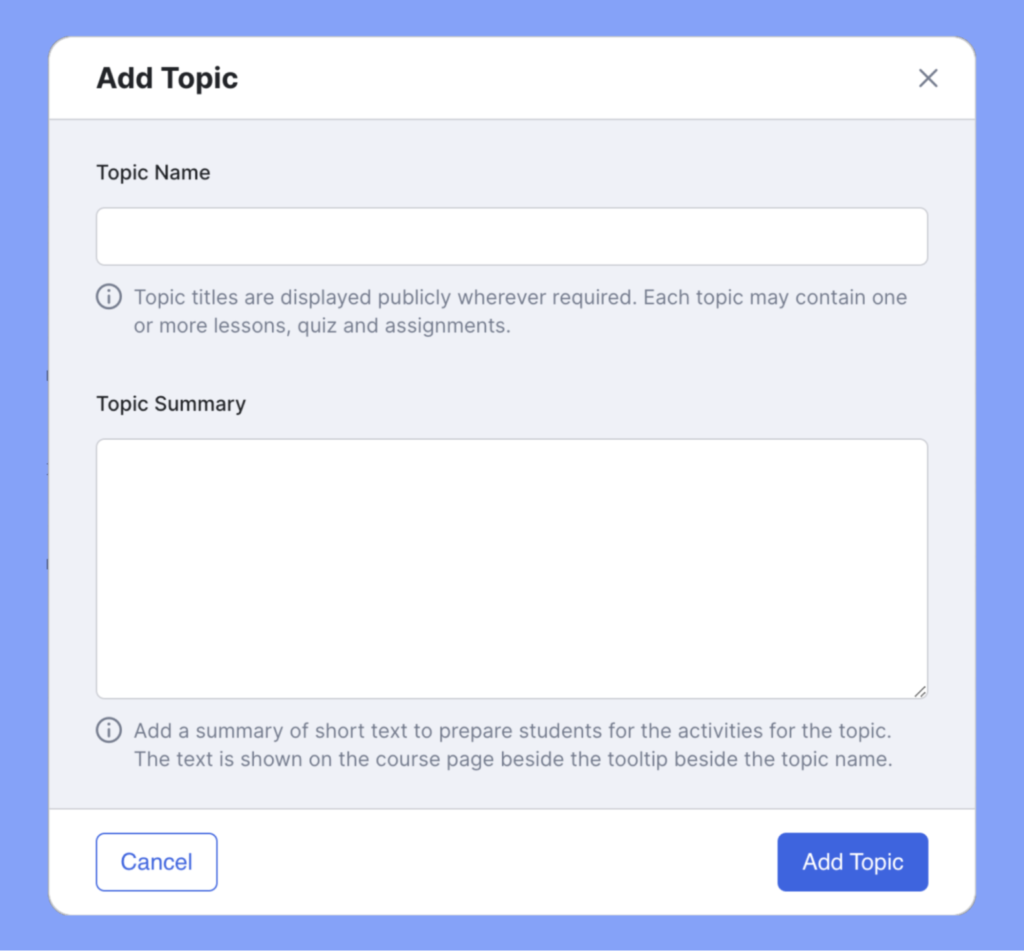
The function of “Add New Topic” enables you to effortlessly generate and structure your course content. By simply providing a name and concise summary for each topic, and utilizing the provided buttons to add lessons and quizzes, you can easily organize your course. The process is intuitive, accompanied by helpful tooltips, ensuring a seamless and streamlined experience.
Add Lesson
To add a new lesson, click on the “+Lesson” button.

In the “Lesson” window, enter a title and description for the lesson and upload a featured image. Then, scroll down to find additional options such as Video Source, Upload Attachment, and more. These options are explained below:

Video Source: You can add the source of the video lesson here. Similar to the Course Intro Video, you can choose from external or internal sources.
Upload Attachments: Upload any necessary materials for this lesson here.
Add Quiz
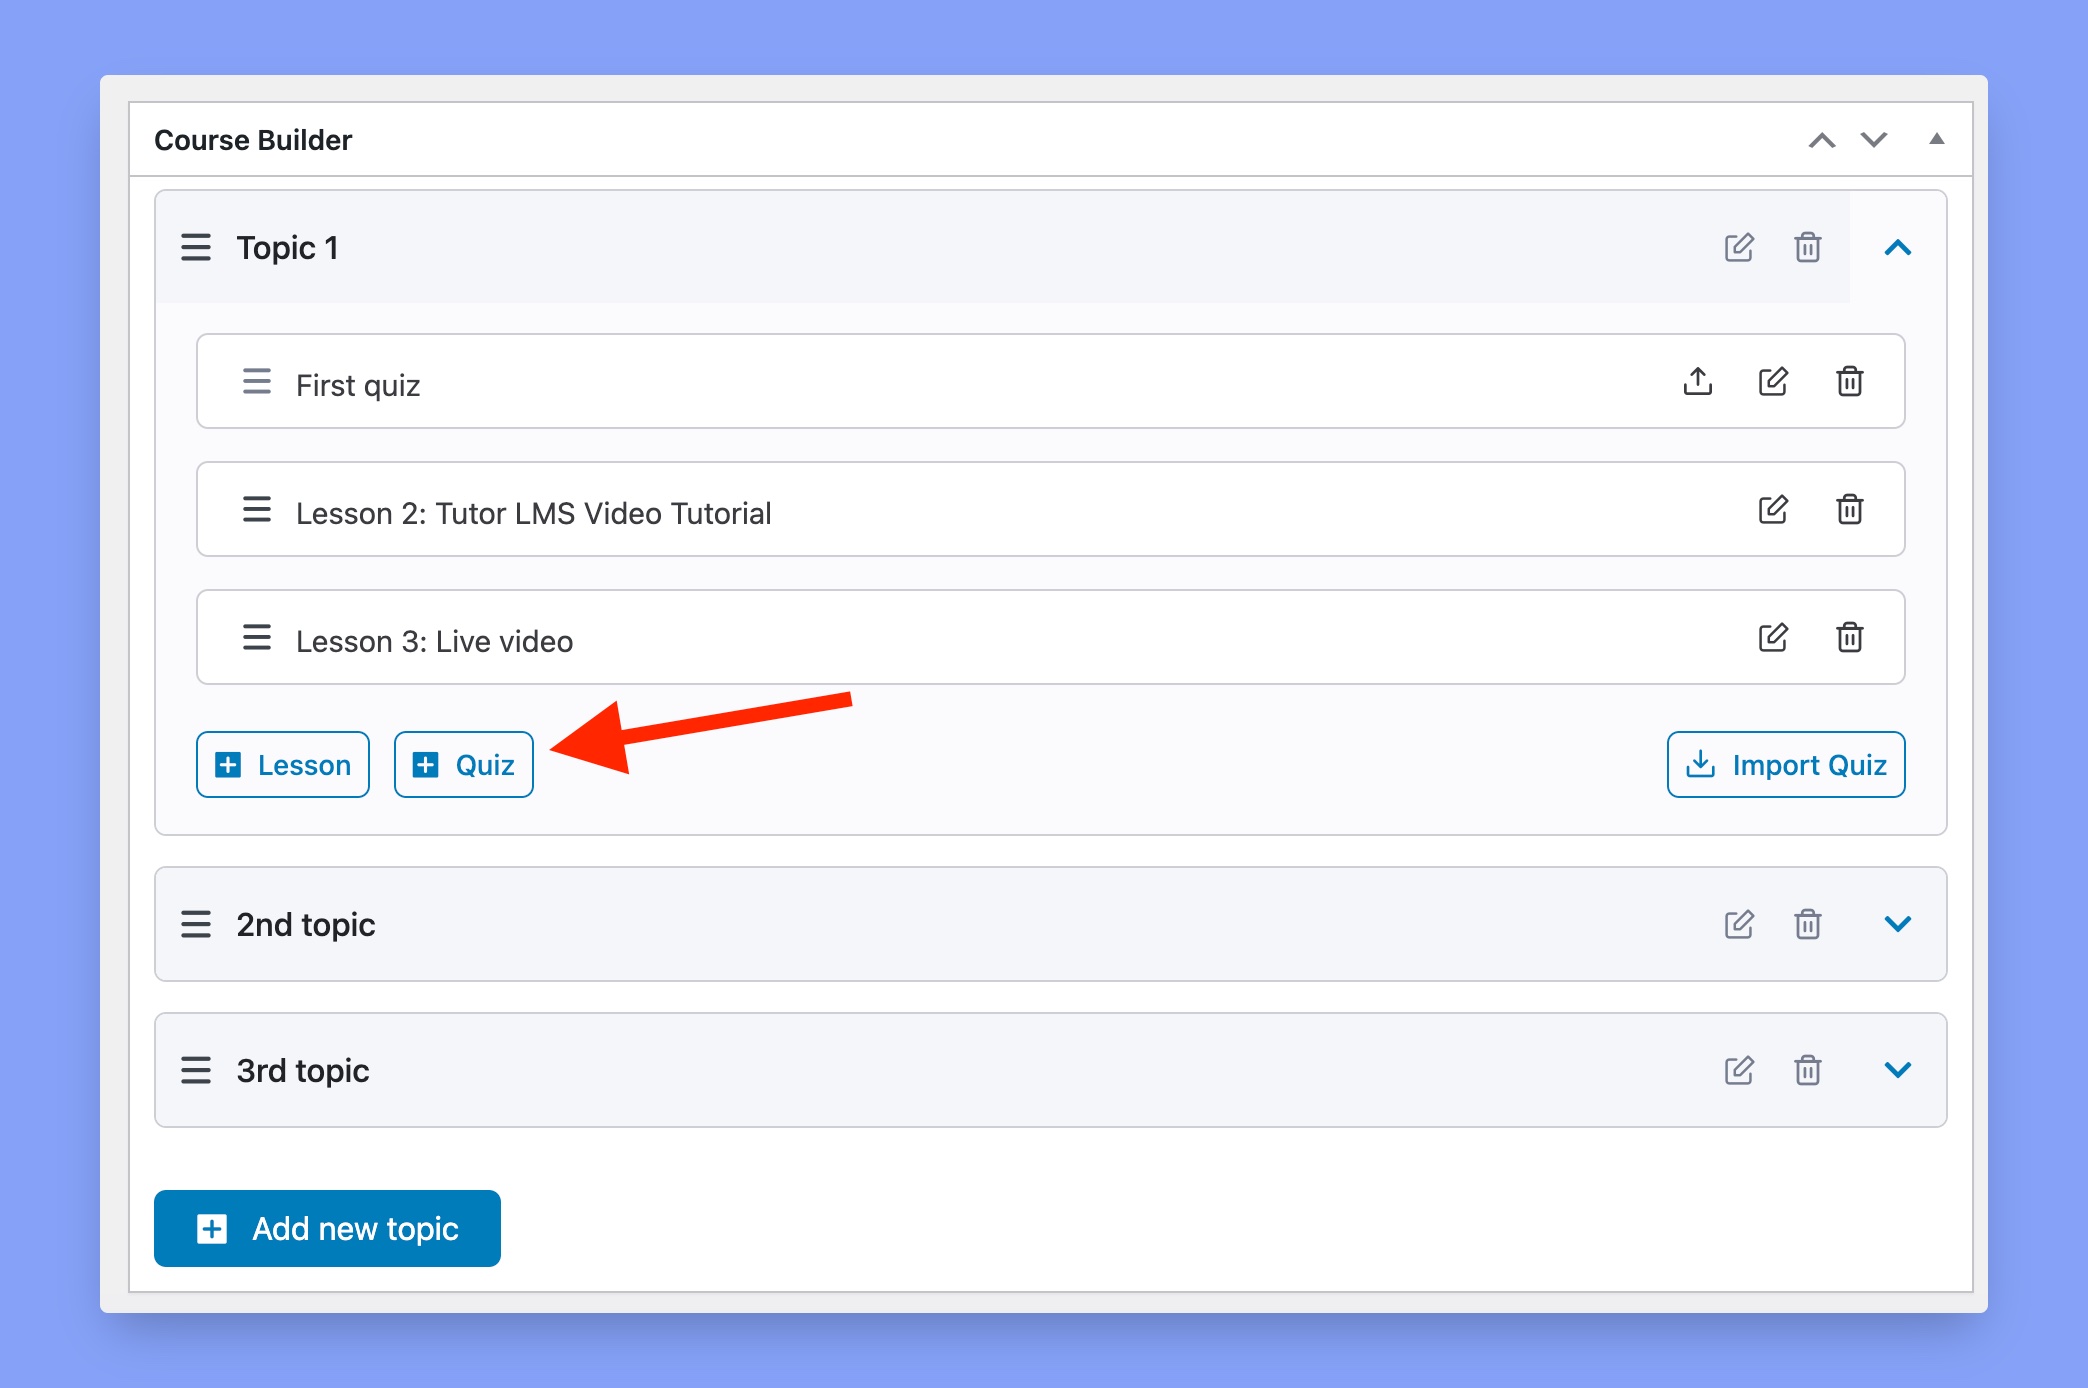
To get started, navigate into a topic and then click on the +Quiz button.
This will open the Quiz Builder window with its very first section called Quiz Info. Here, give the quiz a Title and add a short summary to let students know what this quiz is about.
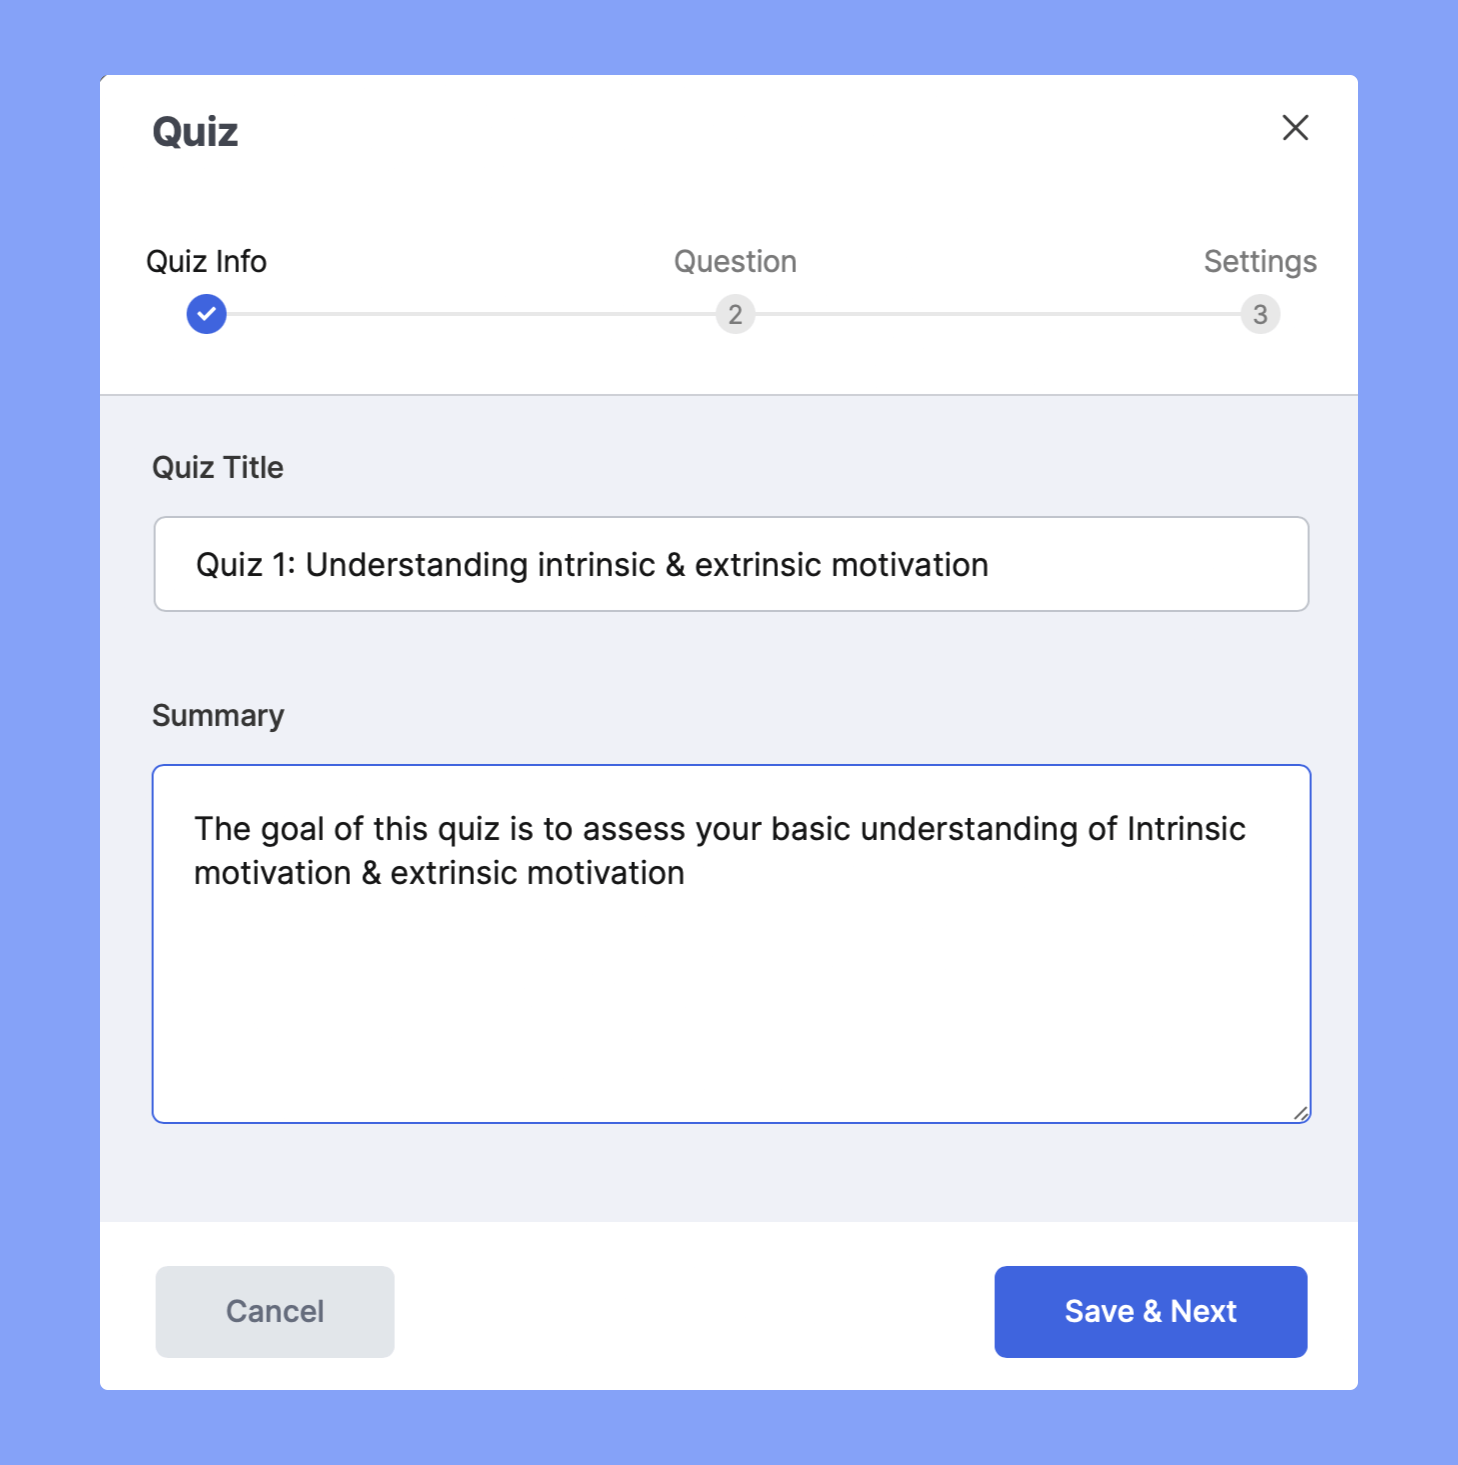
To go to the next stage, i.e. Question, simply click on the Save & Next button.
Question Types
At the Question stage, you can start adding questions to the quiz by clicking on the Add Question button. This will take you to the Question form where you must first select the Question Type.
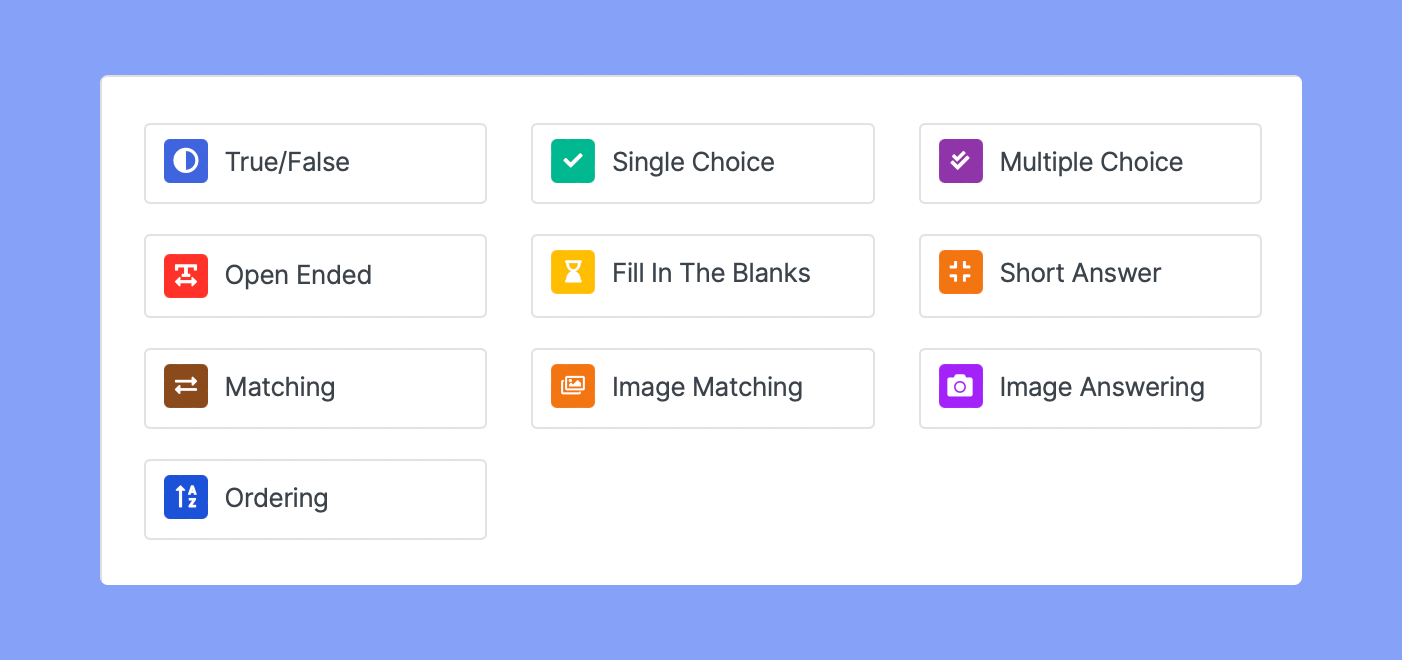
As mentioned earlier, there are a total of 10 question types for VDR4U users. Below is a list of what these types are as well as an explanation of how they work.
True/False
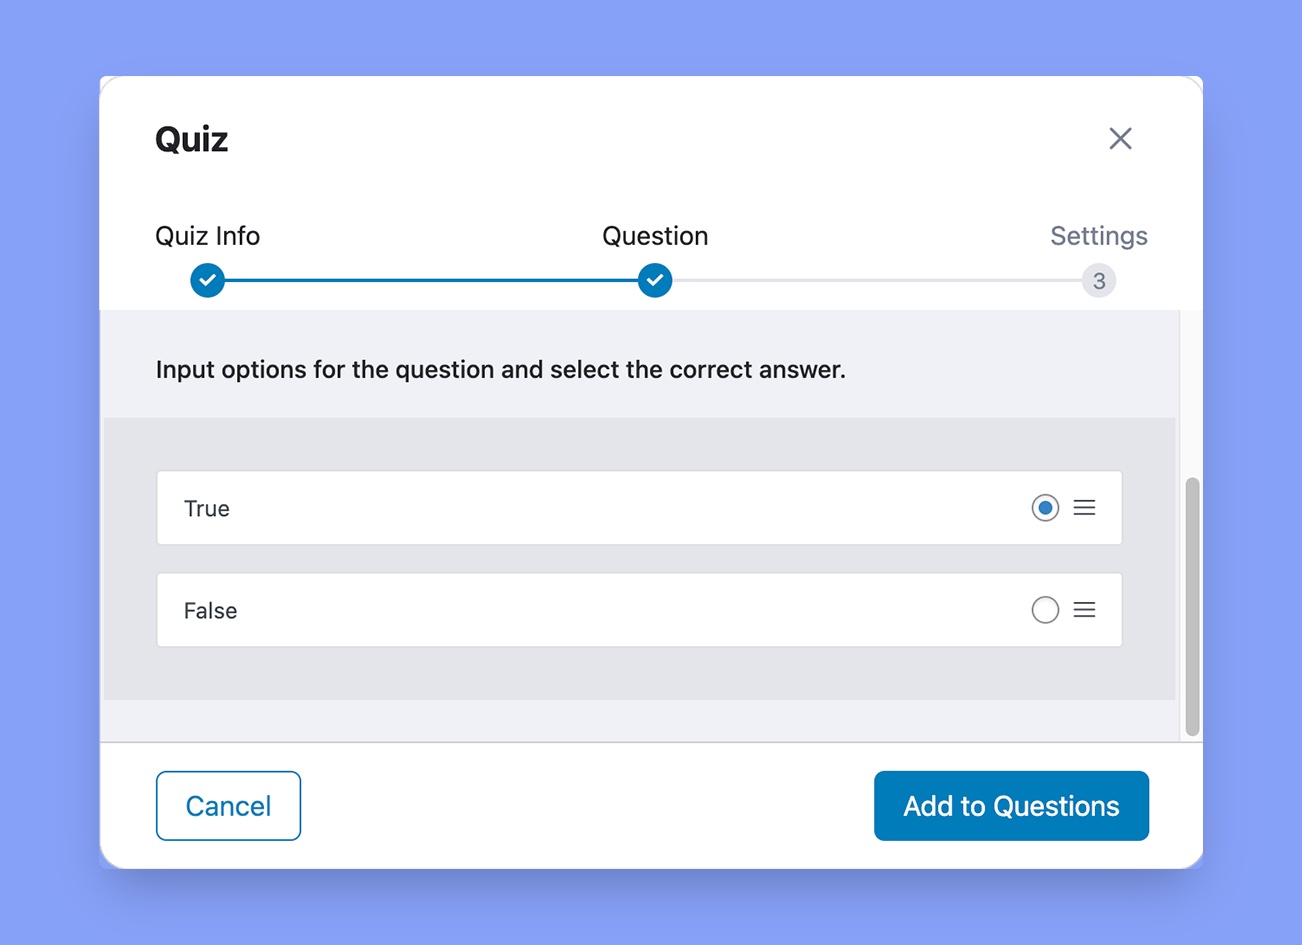
To set up a true/false question, first select your question type as True/False. Then you’ll get the option to choose the answer. Then write your question and choose the answer. Click on the radio button to choose the right answer.
Single Choice
Use the single-choice quiz format if you want to use a multiple-choice question with only one correct answer. To add the options, click on Add an Option and define the answer in the Answer Title, upload an image if needed, and select the display format of your choice.
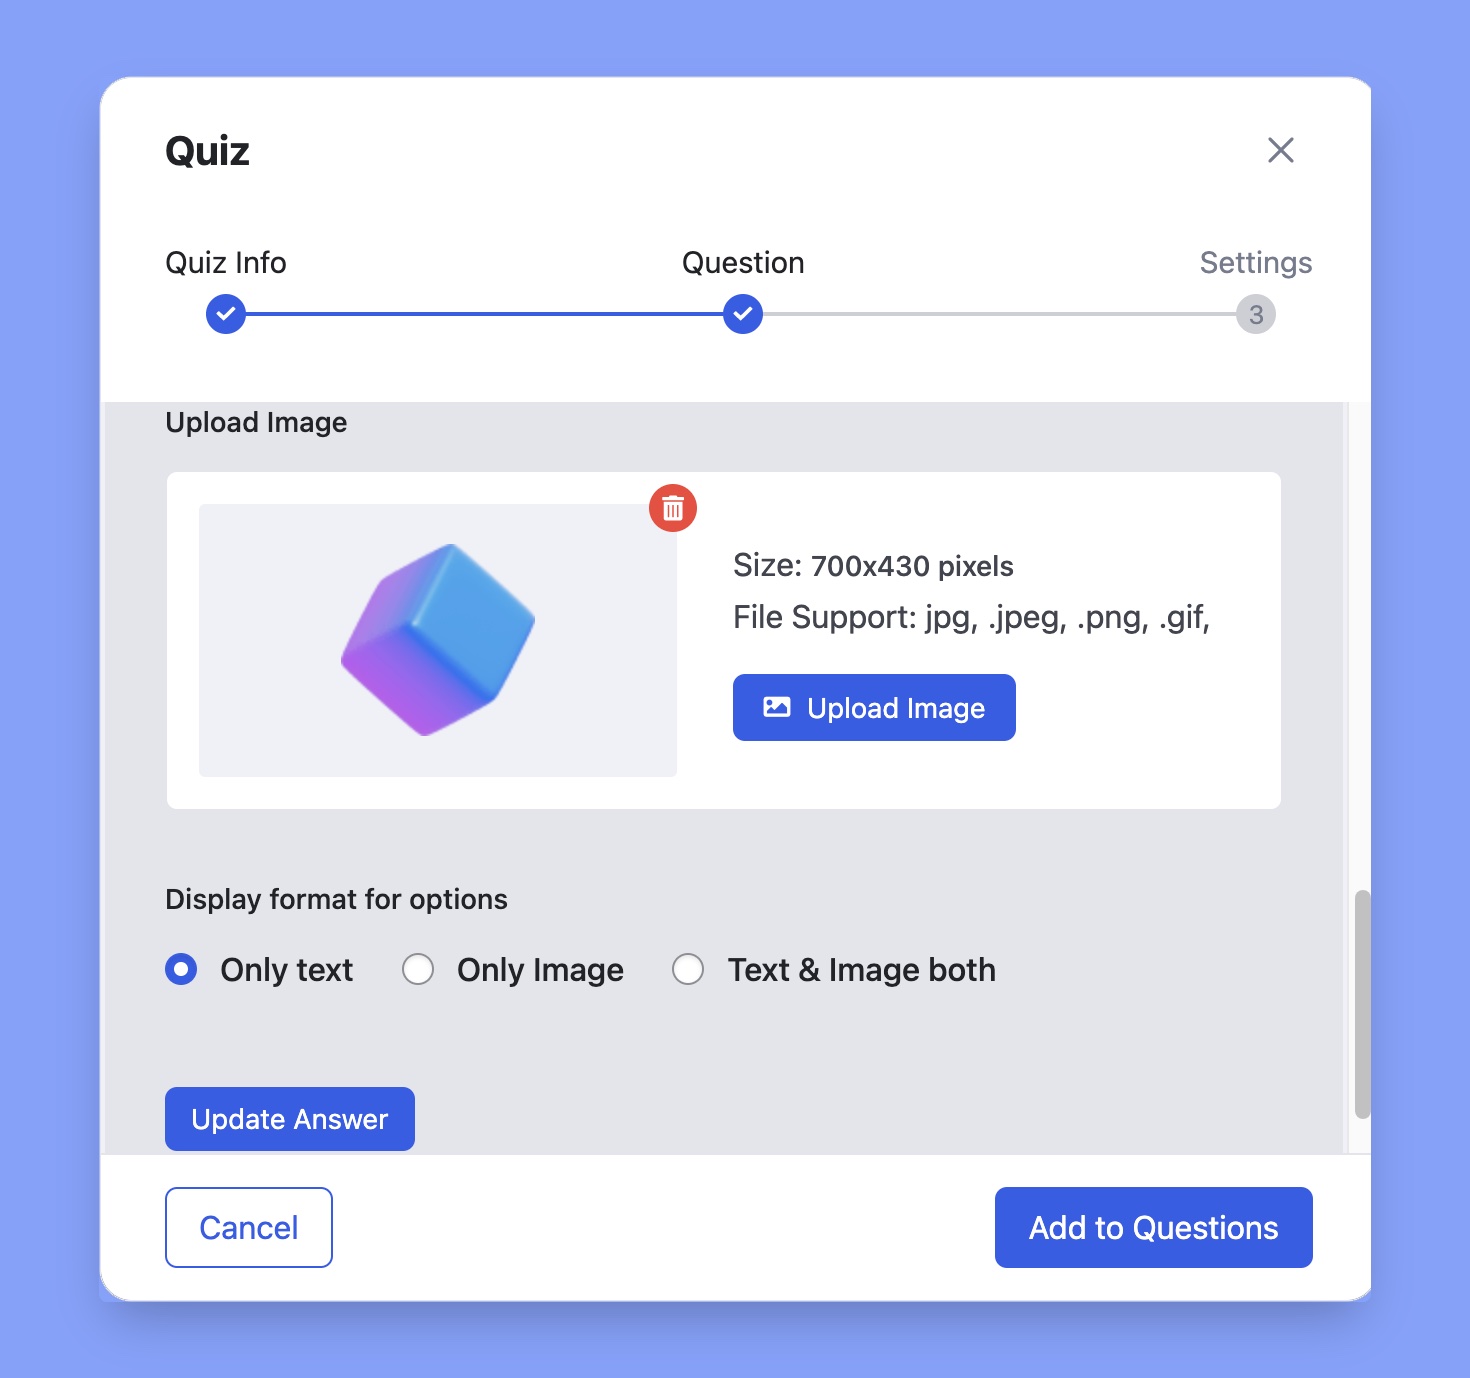
Finally, click on Update Answer and repeat these steps for the other options. Don’t forget to specify the correct answer at the end.
Multiple Choice
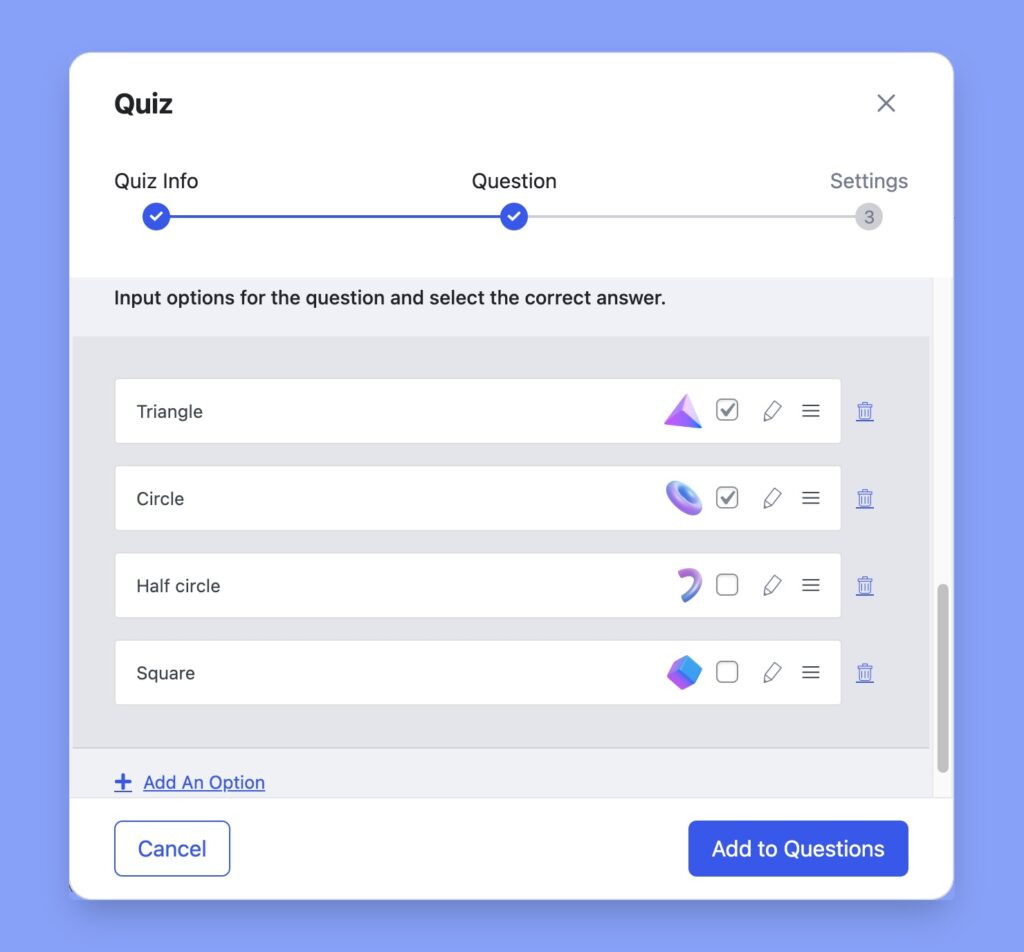
The multiple-choice question is almost similar to the single-choice answer. If you want to list multiple correct answers for a simple question, choose the multiple-choice option. Thus students will get full marks only if they select all of the right answers while answering the question.
Open-Ended
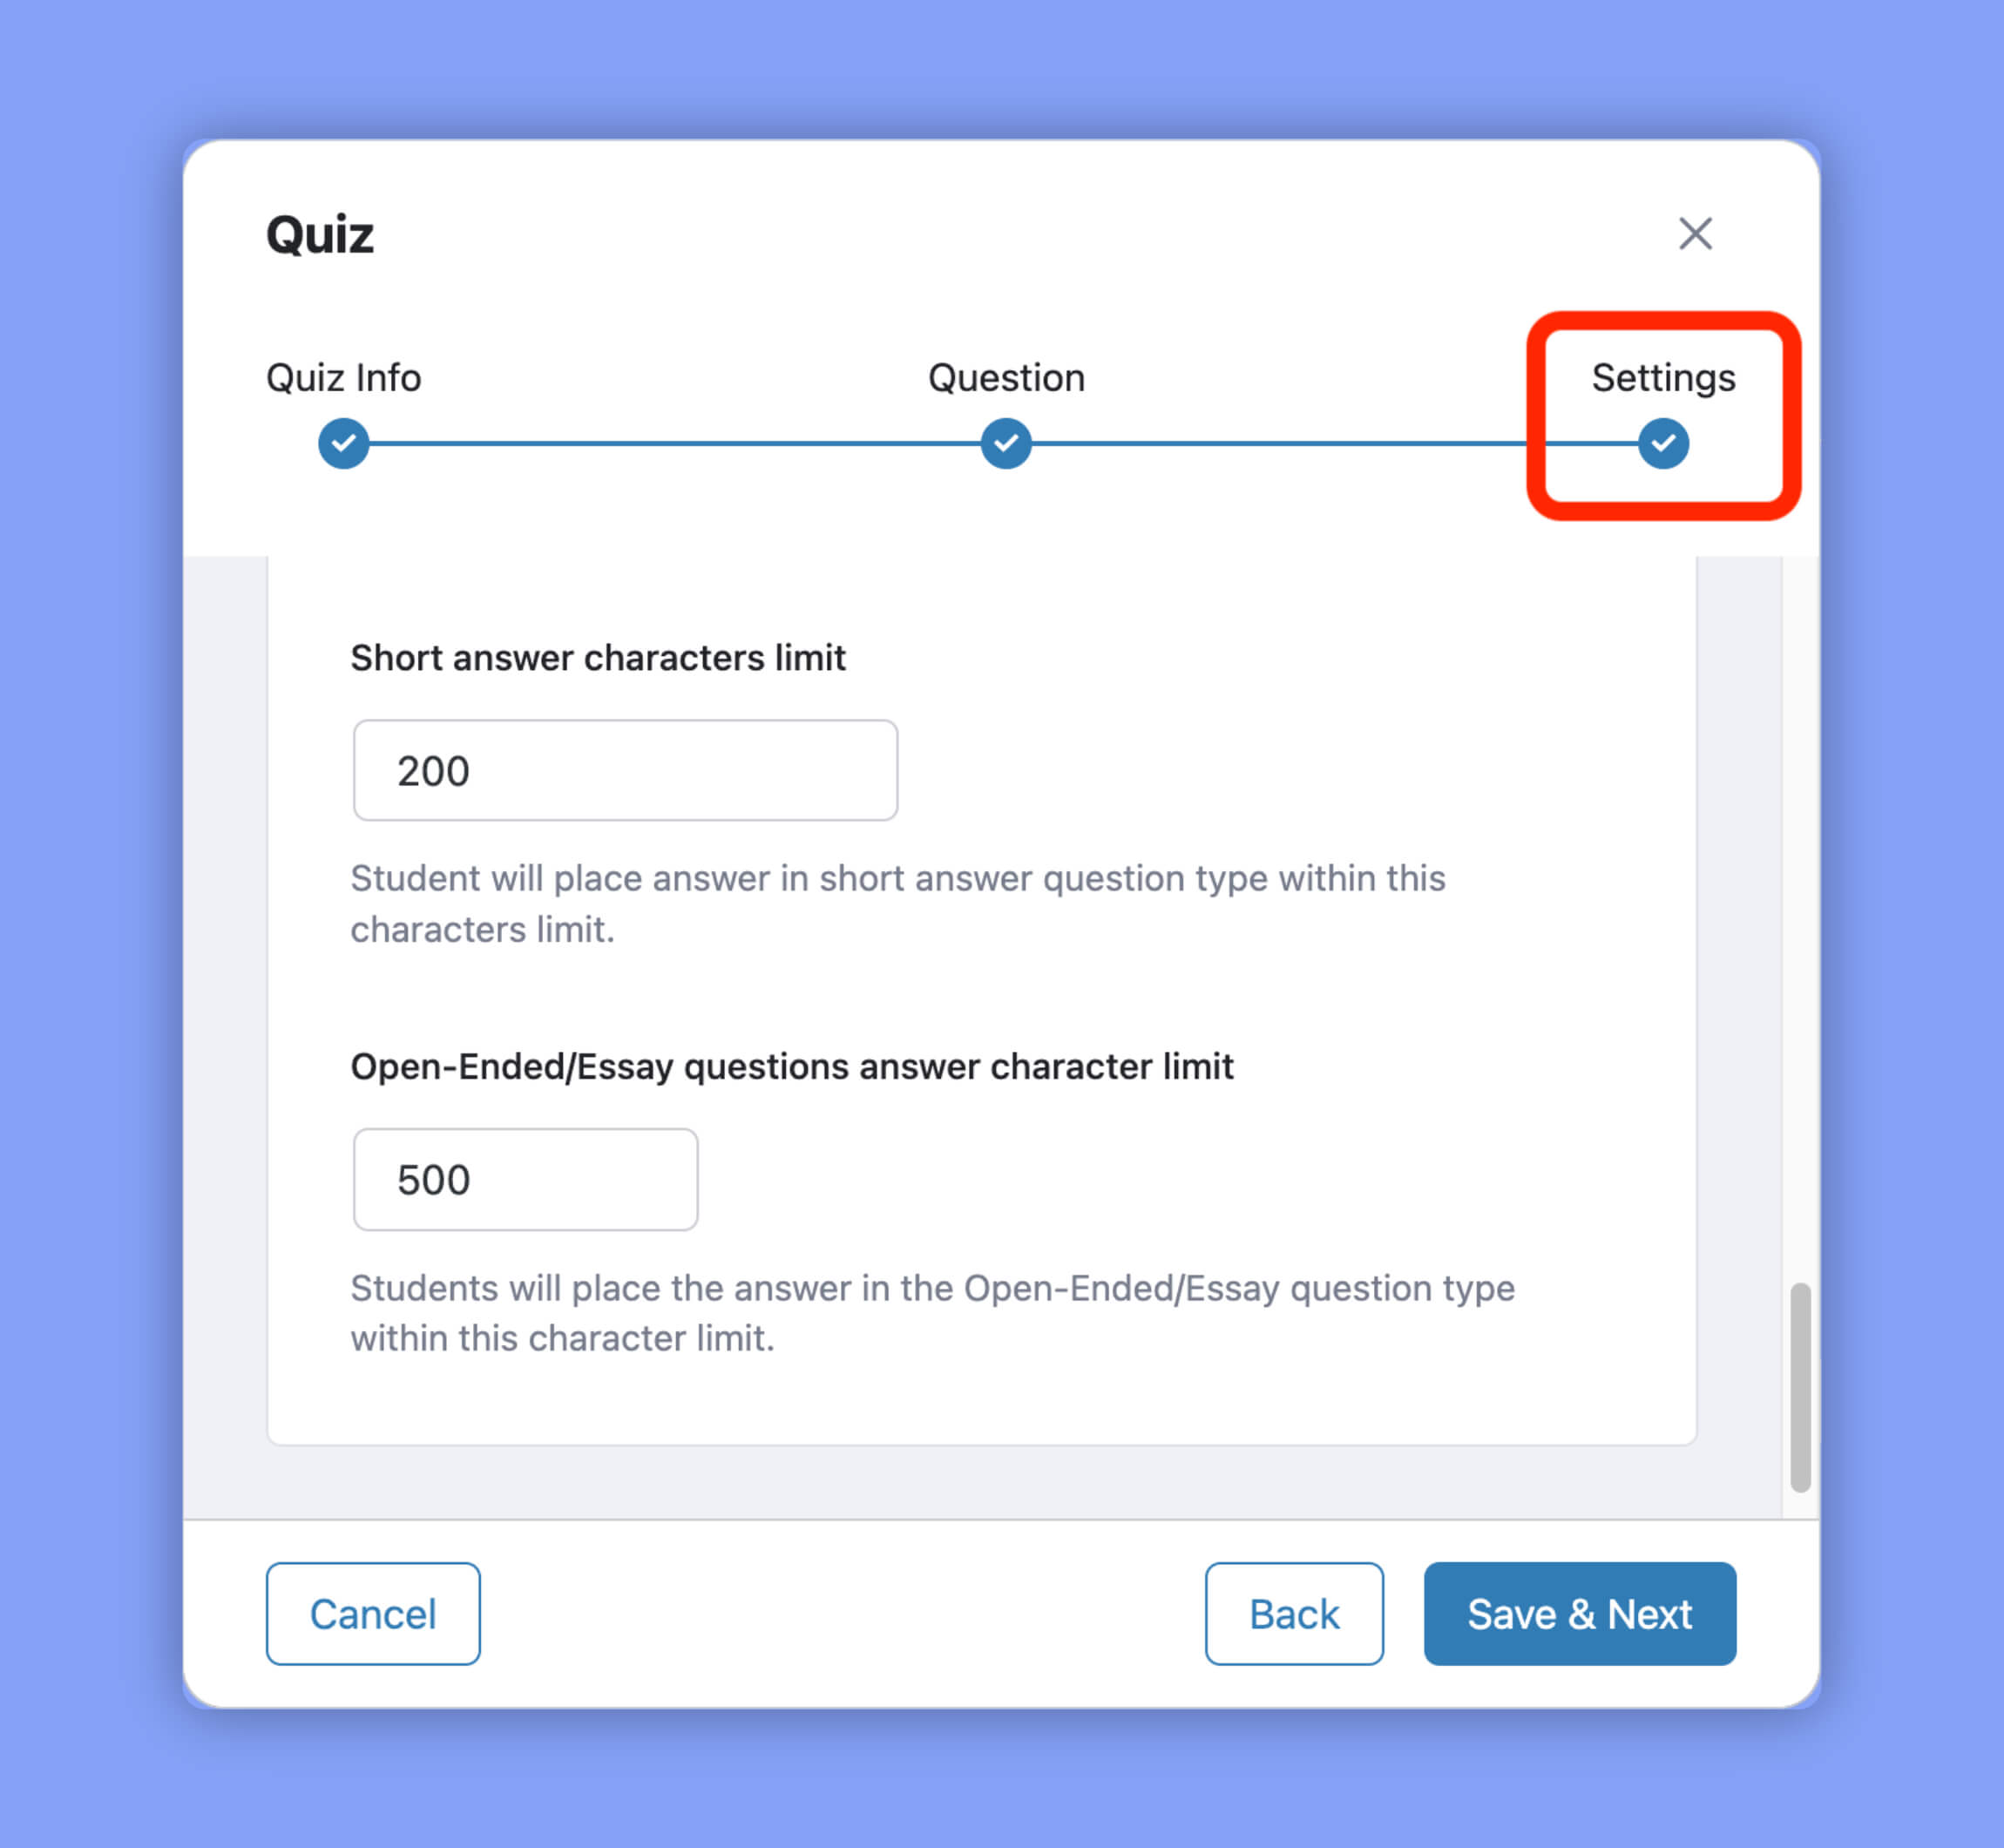
A long answer question type where students can give descriptive answers as this field can have a larger character limit. To define this character limit, go to Quiz Builder > Settings > Advanced Settings and find the Open-Ended/Essay questions answer character limit field.
Short Answer
A Descriptive-type question with a more precise and shorter answer. Instructors can define Character Limit> Settings > Advanced Settings under the Short answer characters limit in Quiz Builder.
Fill In The Blanks
Set a sentence prompting students to fill up the missing blanks with the correct answers.
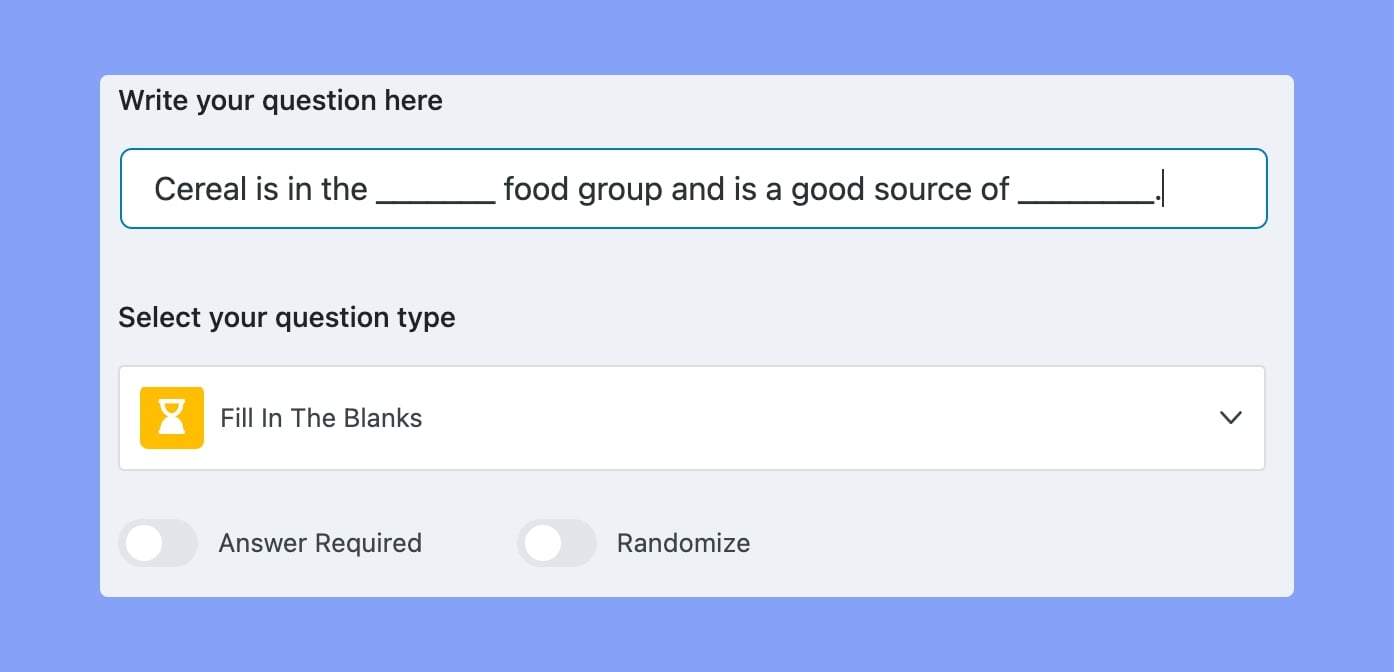
Here first, enter the question and then click on Add an Option.
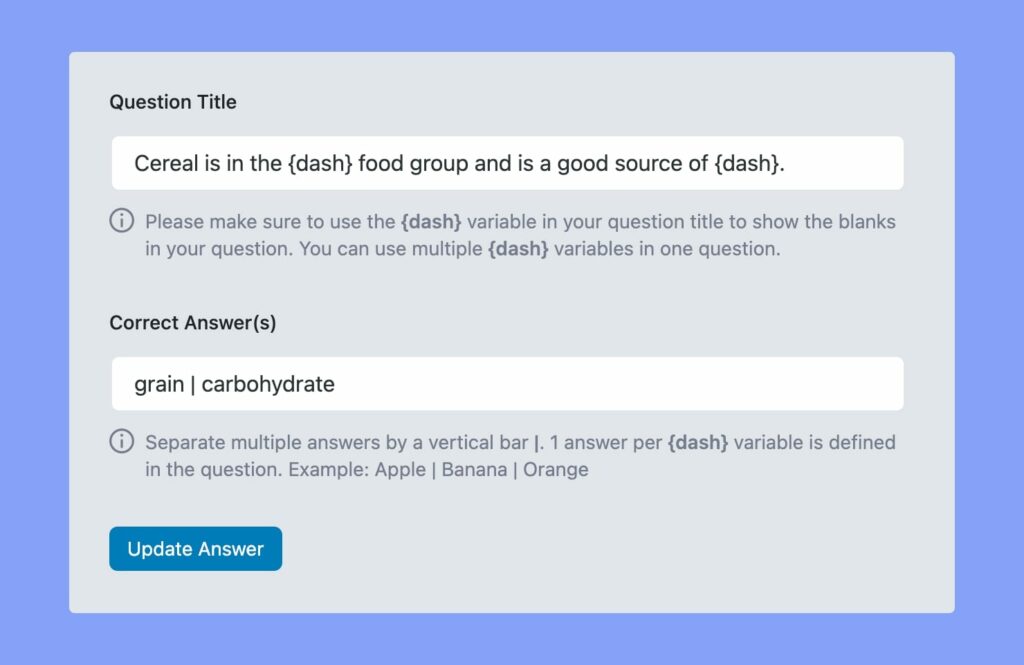
Then, type your entire question again under Question Title and replace the blanks with the variable {dash}. Below that field, define your Correct Answers each separated by a vertical bar |. Let’s check an example.
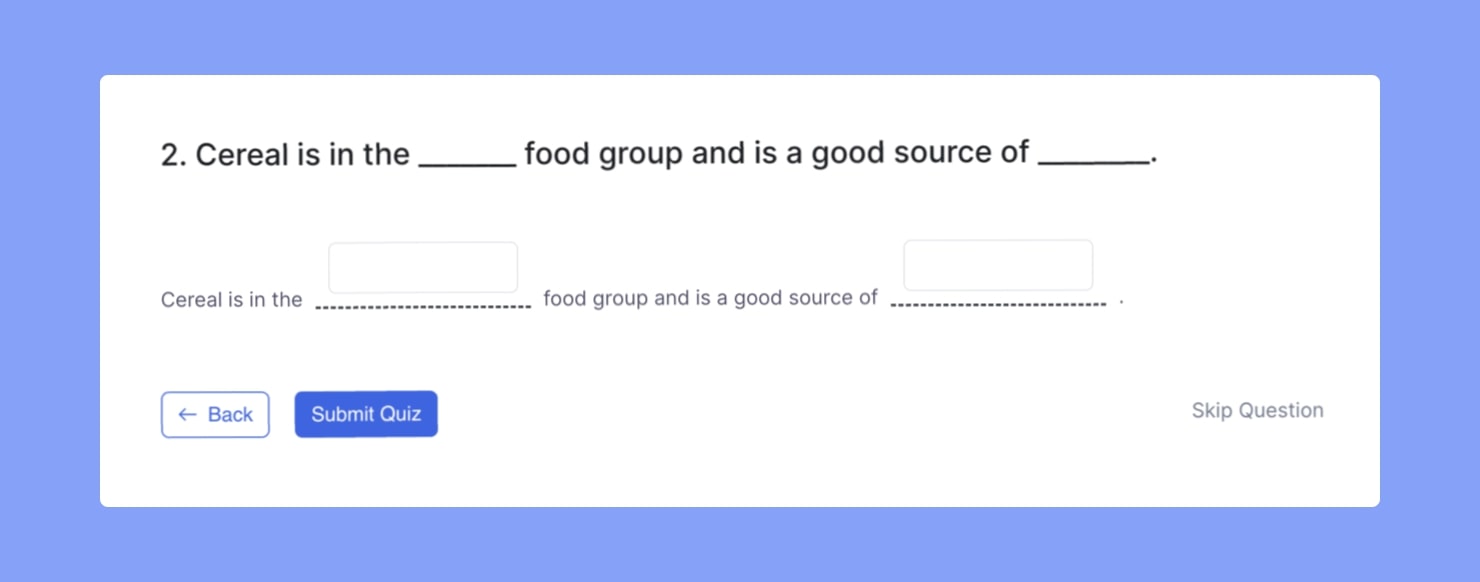
Students will see something like what’s shown in the image above on the frontend when they take the quiz.
Matching
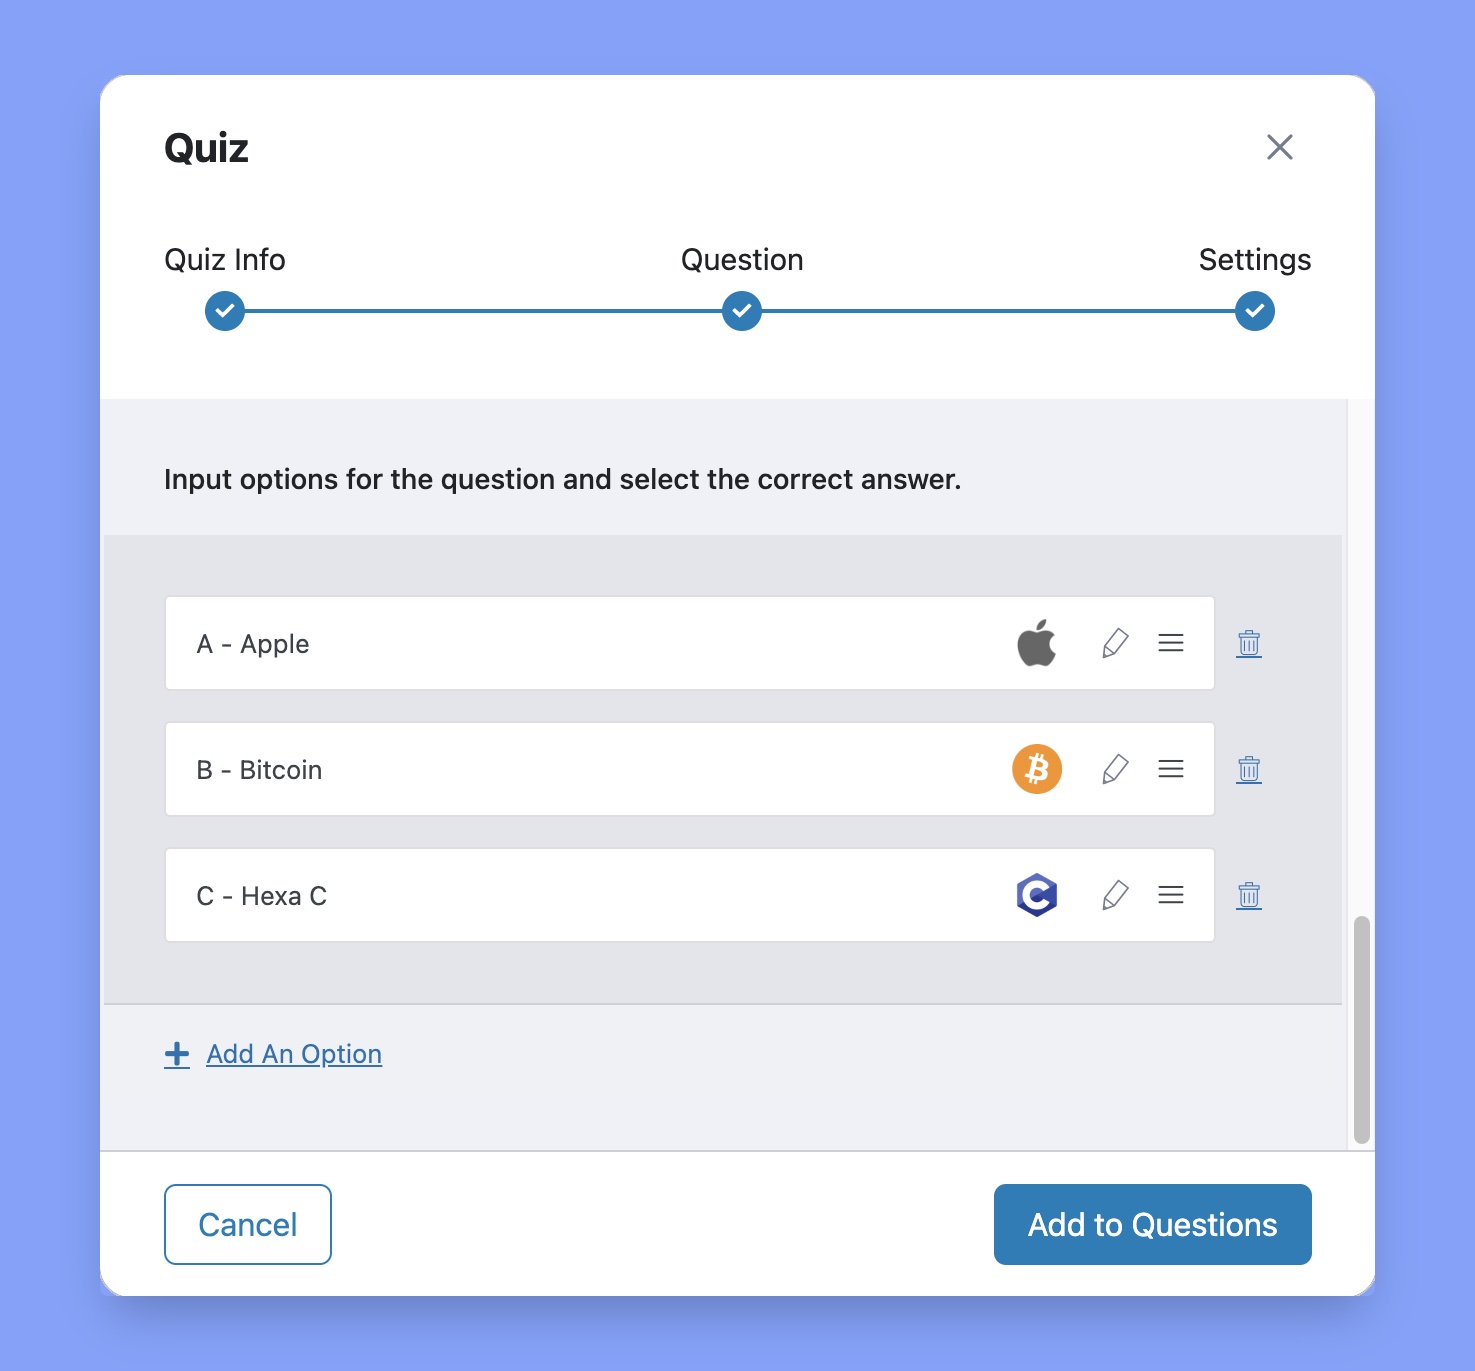
Use this answering category only if you want to set a question pattern where students have to match the answers. To do this, enter your question and click on Add an Option. Enter your answer prompt and its matched answer.
You can also upload an image along with the answer prompt. Finally, select the display format you prefer and repeat these steps to add more options.
Ordering
Set an ordering question where students have to reorder the given text, images, or both in the correct sequence to obtain marks.
Here, click on Add an Option and enter your first answer item under the Answer Title field. Like the previous question types, you can also upload an image to go along with this.
Repeat these steps to add more items and make sure to add them in the right order.
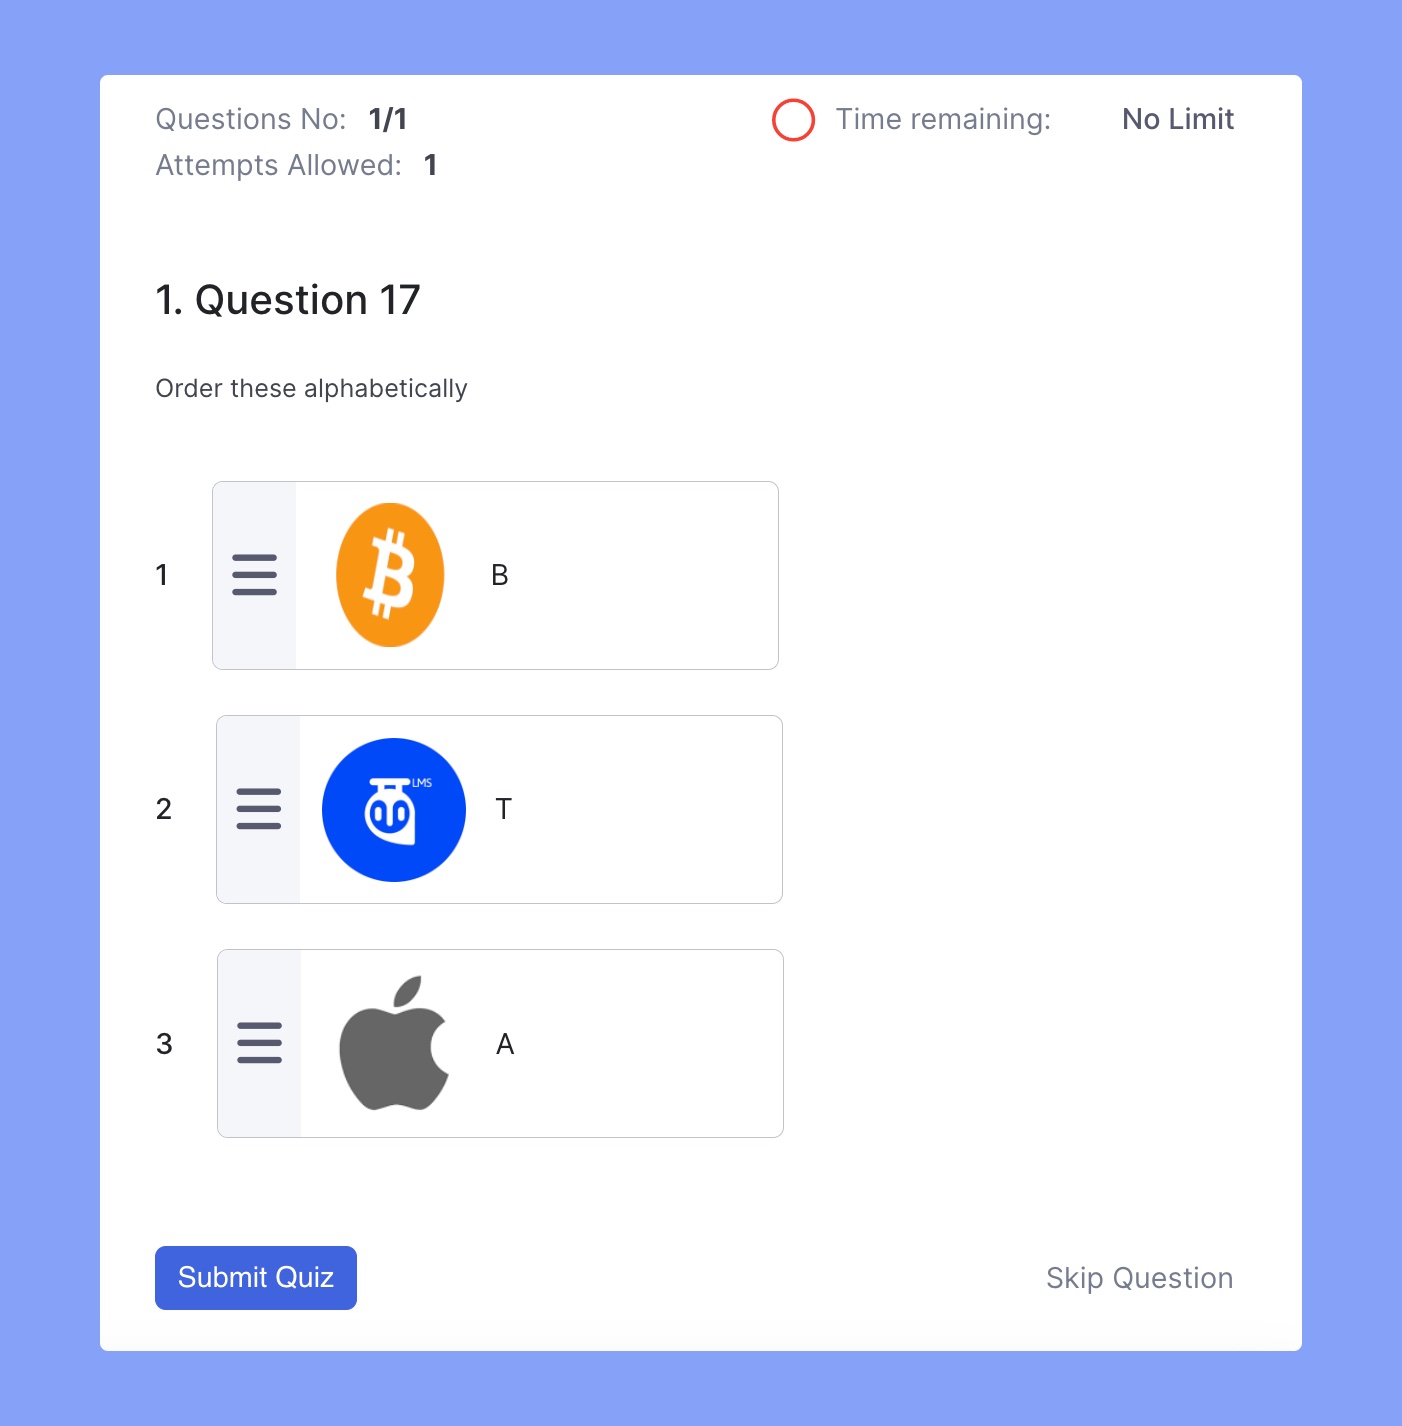
Image Matching
Set a matching type question where students can match an image to the correct text to obtain marks.
To implement this, enter your question, click on Add an Option and upload your image prompt, enter its matched answer and click on Update Answer. Repeat these steps to add more options.
Image Answering
Set an identification type question where students need to answer questions based on images.
Similar to Image Matching, click on Add an Option and upload your image and then enter its corresponding answer. Lastly, click on Update Answer and repeat these steps to add more options.
Question
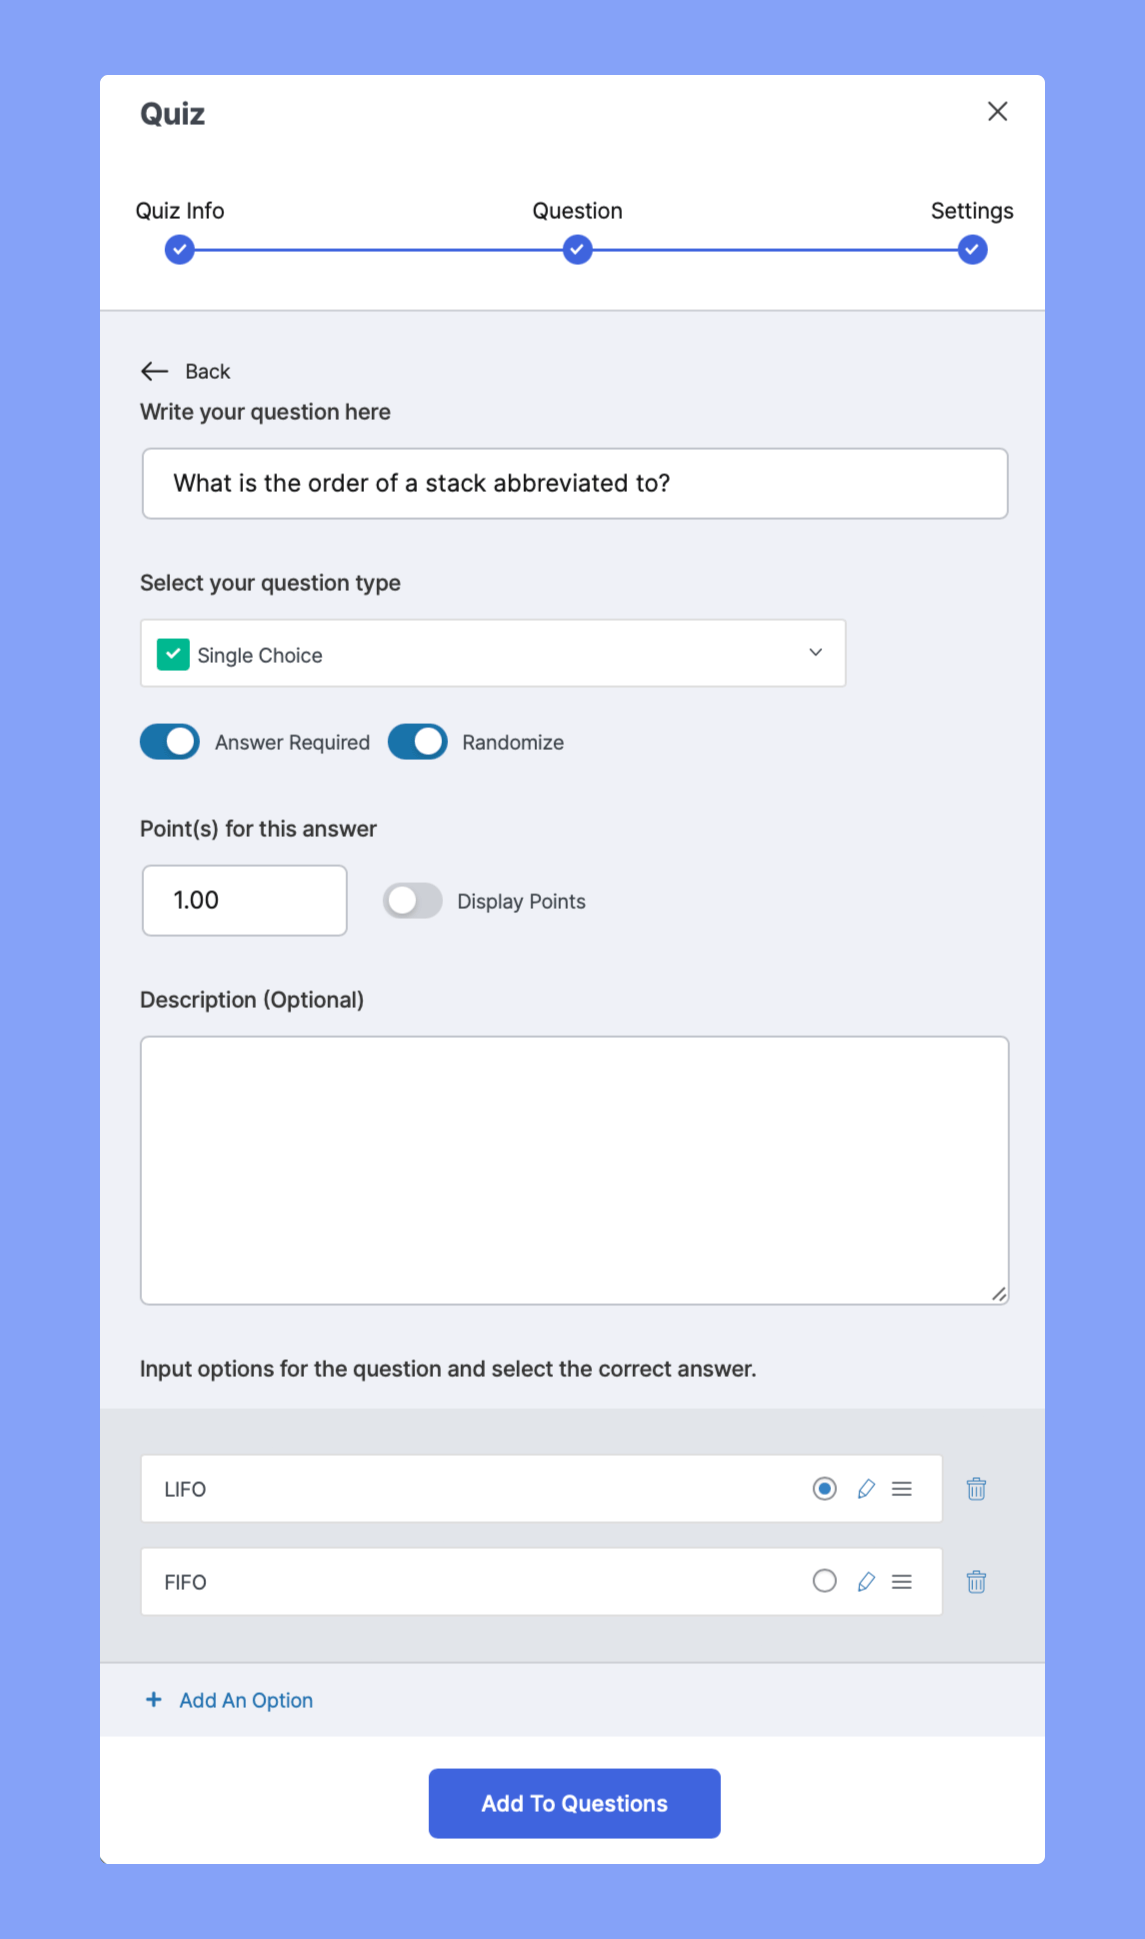
On the Question Form, add the question text, select the type from the dropdown, and add a description if you want. Following that, are a few settings for each question that you need to understand to best use them:
- Answer Required: Toggle this if you want this question to be mandatory to answer.
- Randomize: Toggle this if you want this question’s order to be randomly shuffled among the list of questions.
- Points for this answer: Use this field to set the points to be awarded for getting this question right.
- Display points: Enable this if you want to display the points on the quiz field.
Add the relevant answer(s) and select the correct answer if required. Once you’re done, click on Add to Questions to save it. Doing this will take you back to the previous window where you’ll see the new question already added.
To add more questions, simply click on the Add a Question button again and repeat the same steps. Once you’re done adding all of the questions, click on the Save & Next button to go to the final stage of quiz building which is Settings.
Settings
In this section, you can use the following settings to adjust the quiz behavior according to your preferences. Let’s explain all of these settings in short:
Time Limit
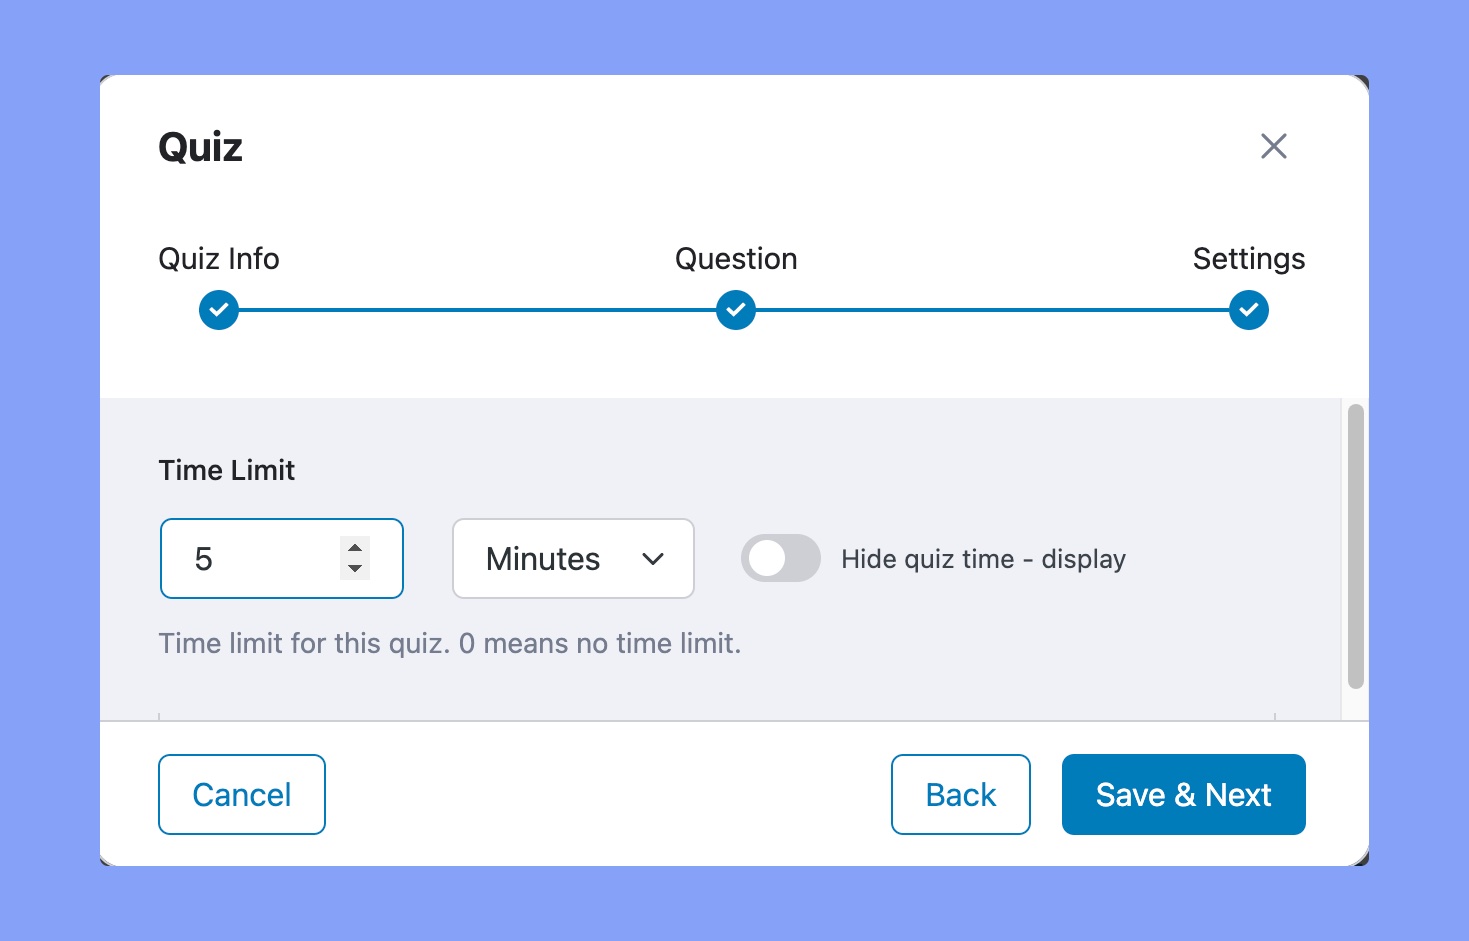
You can set time limit from here in seconds, minutes, hours, days, and weeks format. Use 0, if you don’t want to set any time limit. Besides, you can also hide the quiz time by toggling the Hide quiz time button.
Quiz Feedback Mode
Decide how you want to provide your students with feedback after they are done taking the quiz. The tooltips give you an idea of what each mode means.
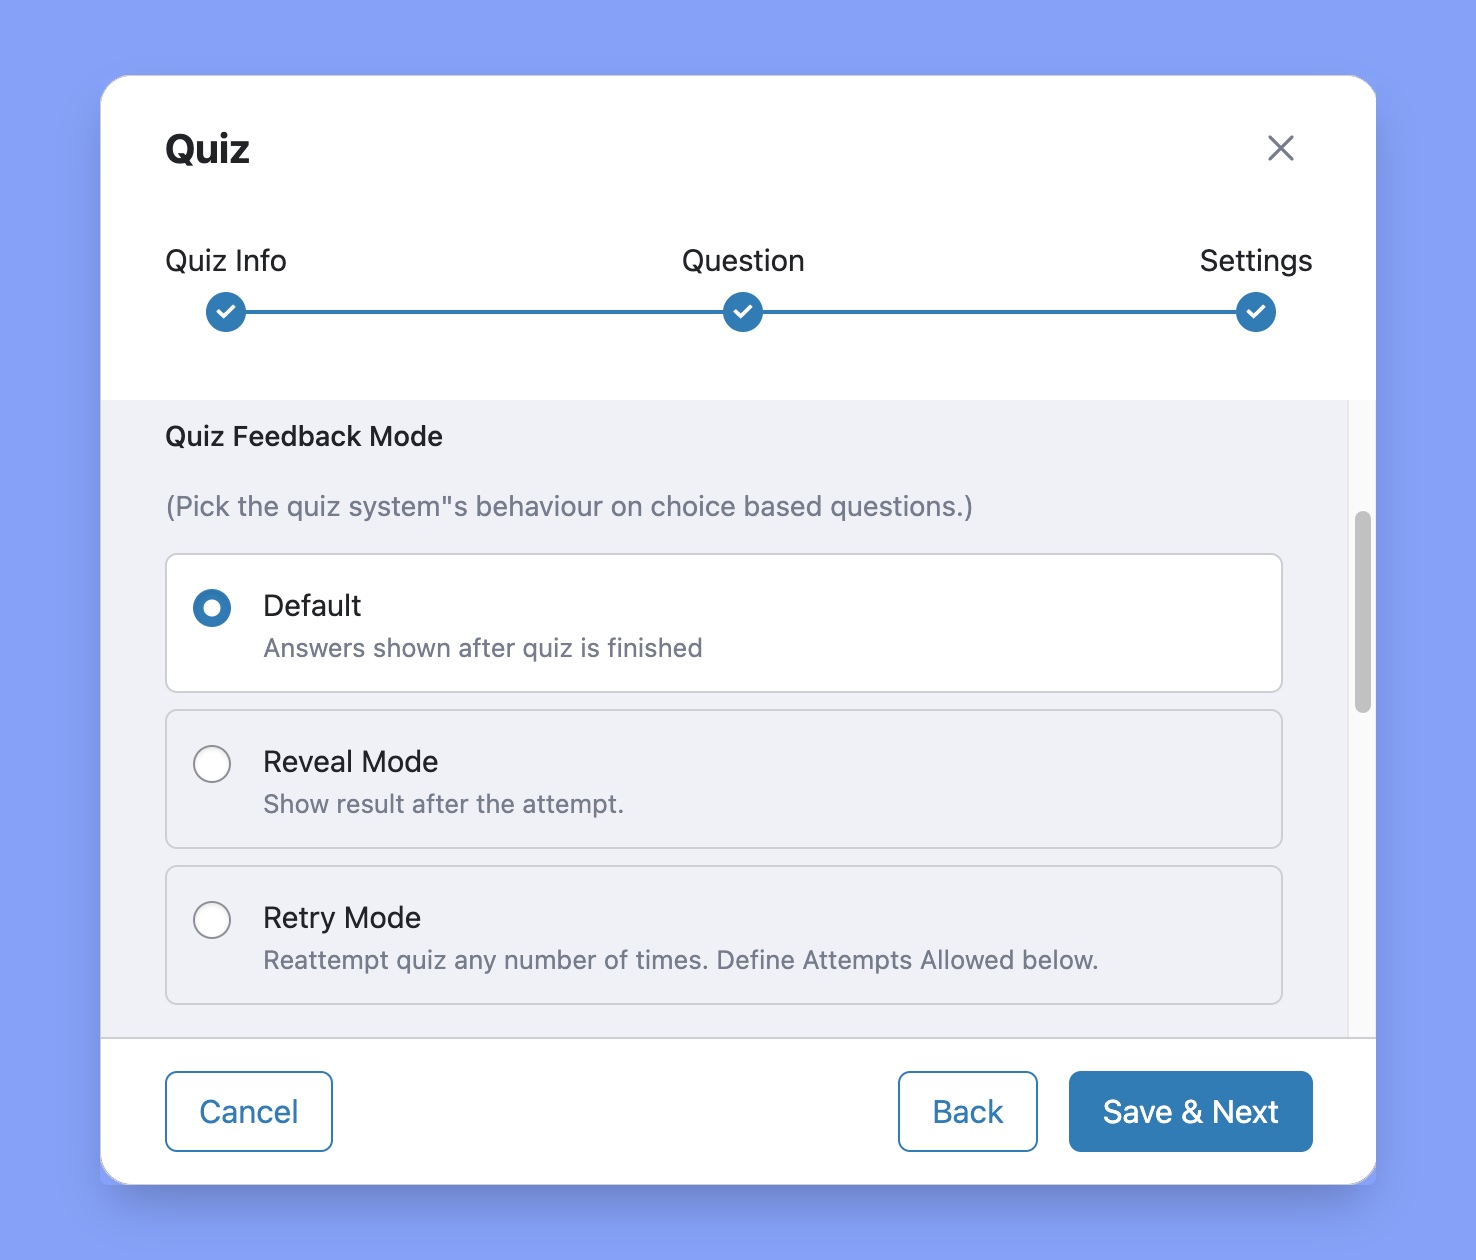
Here, you’ll get three different feedback modes. These are:
- Default: Answers are displayed after the quiz is finished.
- Reveal Mode: Answers are shown after the attempt.
- Retry Mode: Reattempt the quiz any number of times. You can define the number of times students can repeat a quiz using the Attempts Allowed setting.
Passing grade
It specifies the passing grade for this quiz. You can set the passing grade only in the percentage unit.
Max Question Allowed to Answer
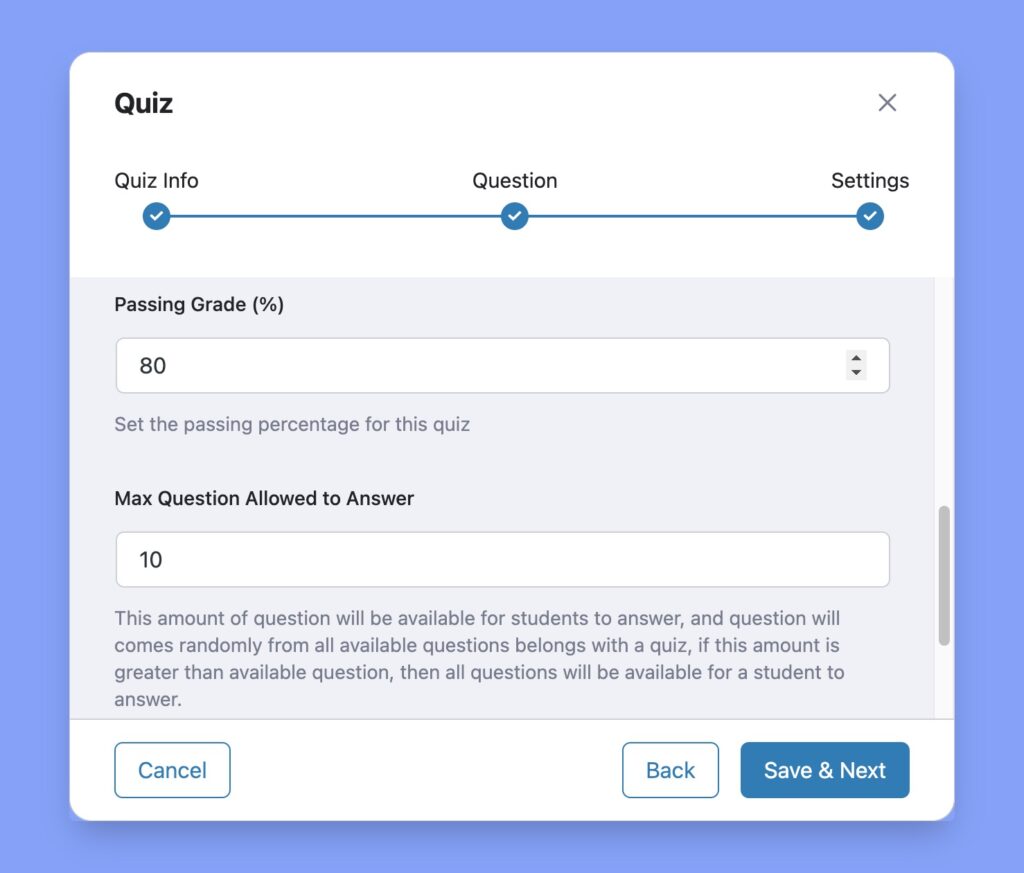
This feature is introduced to randomize questions in a quiz. The purpose of this function would be more clear with an example.
This option is a little bit tricky. Let’s have an example. Suppose, you have 50 questions in a quiz, if you put 50 here, a student will have to answer all 50 questions in order to complete the quiz. But if you put 10 here, the student will have to answer only 10 questions out of the 50 and these 10 questions will appear randomly. No student will get the same set of questions.
Advanced Settings
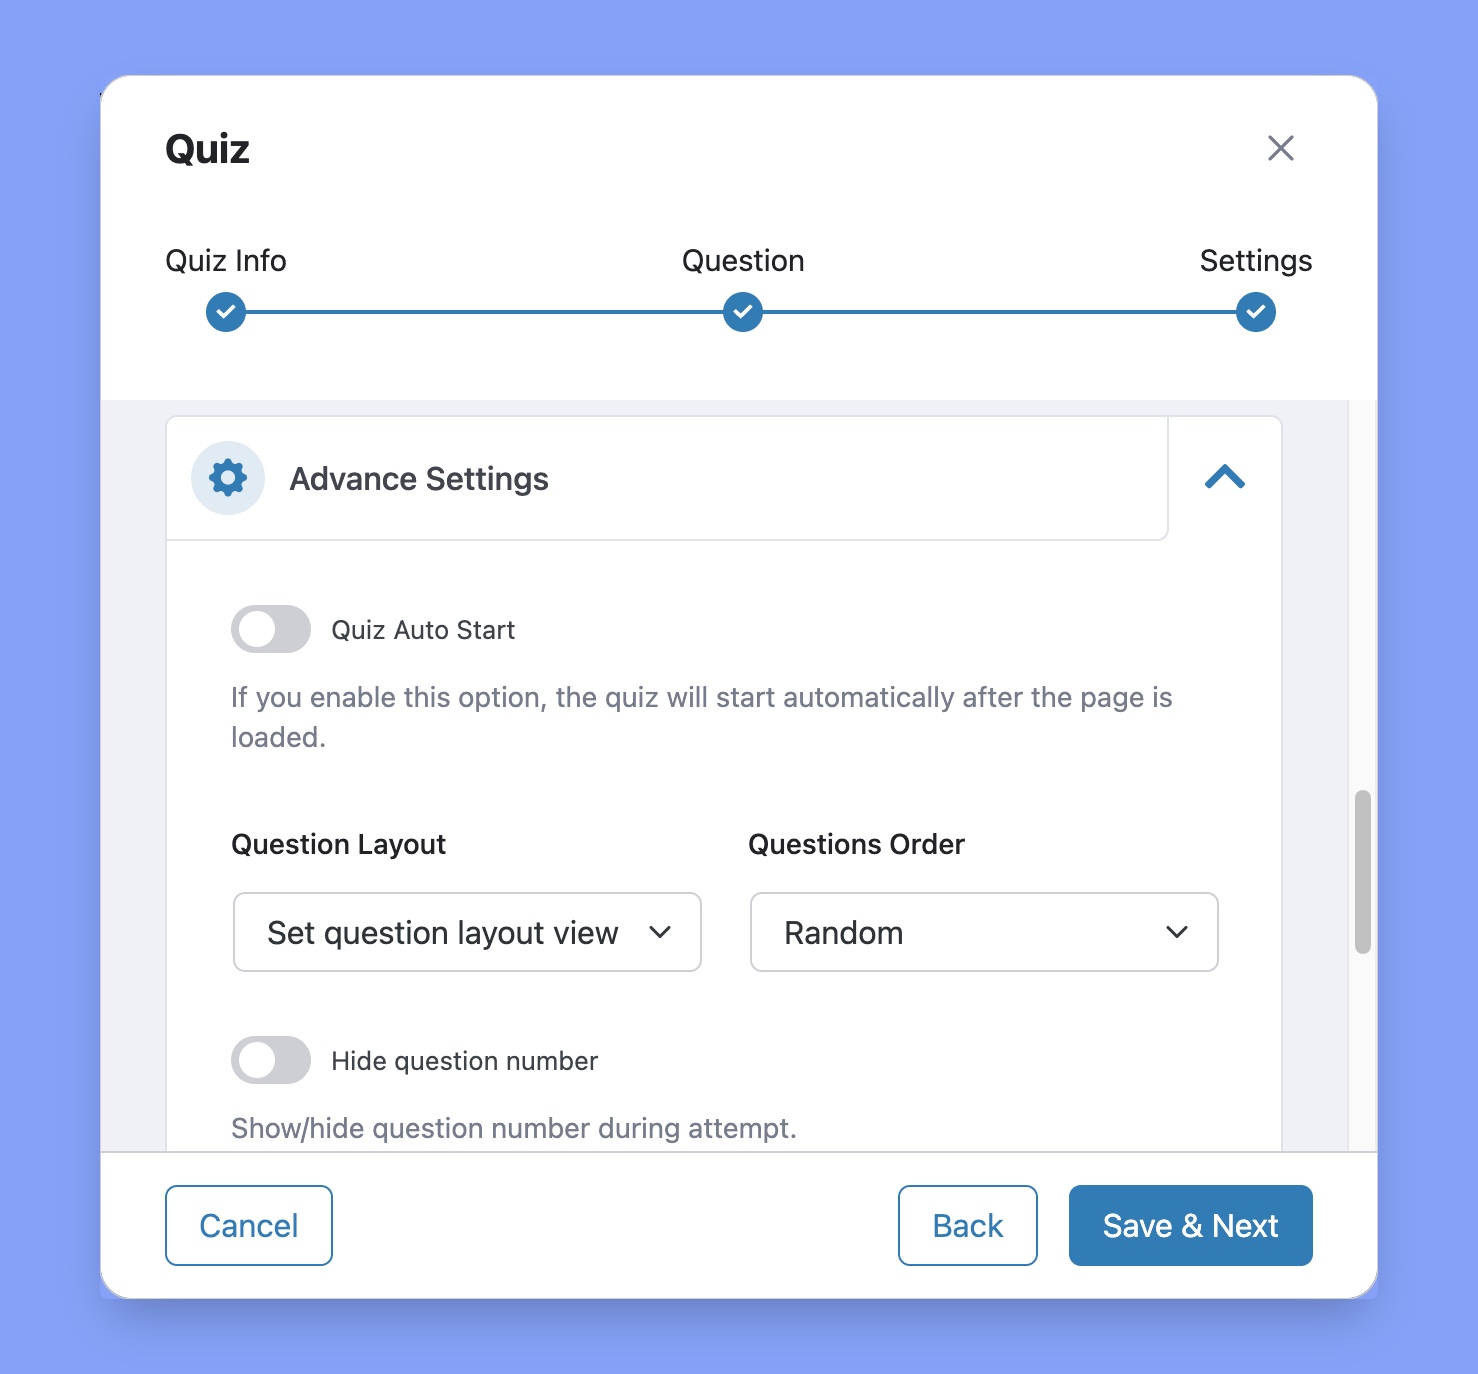
The following are some more Advanced Settings options that you can access by clicking on the Advanced Settings header.
- Quiz Auto Start: Enable this to make the quiz start immediately after the page is loaded.
- Question Layout: Set the layout for the quiz page. Options include Single Question, Pagination, and Question below the other.
- Question Order: Select the order for the questions provided to you. Options include Random, Sorting, Ascending, and Descending.
- Hide Question Number: Select to hide the question number during the quiz.
- Short Answer Character Limit: Select the character limit for short answers.
- Open-ended/Essay Question Answer Character Limit: Select the character limit for open-ended/essay question answers.
Finally, once you’re satisfied with the settings click on Save & Next again to save your quiz. It should appear under your chosen topic on the Course Builder.
To Edit the quiz, simply click on the edit icon that’s on the right side of the quiz listing, and to Delete it, click on the trash icon that’s right beside it.
Make Passing a Quiz Mandatory to Access Next Course Content
- On the Course Builder page, under Course Settings, enable Content Drip and set its type to Course content available sequentially.
- At this point, update the course to ensure this change is applied.
- Next, from Quiz Builder > Settings set the Quiz Feedback Mode as Retry Mode.
- Finally, you should see the Passing is Required toggle appear below the Attempts Allowed slider. All you have to do now is enable this option, click on Save & Next, and Update your course to save the changes.
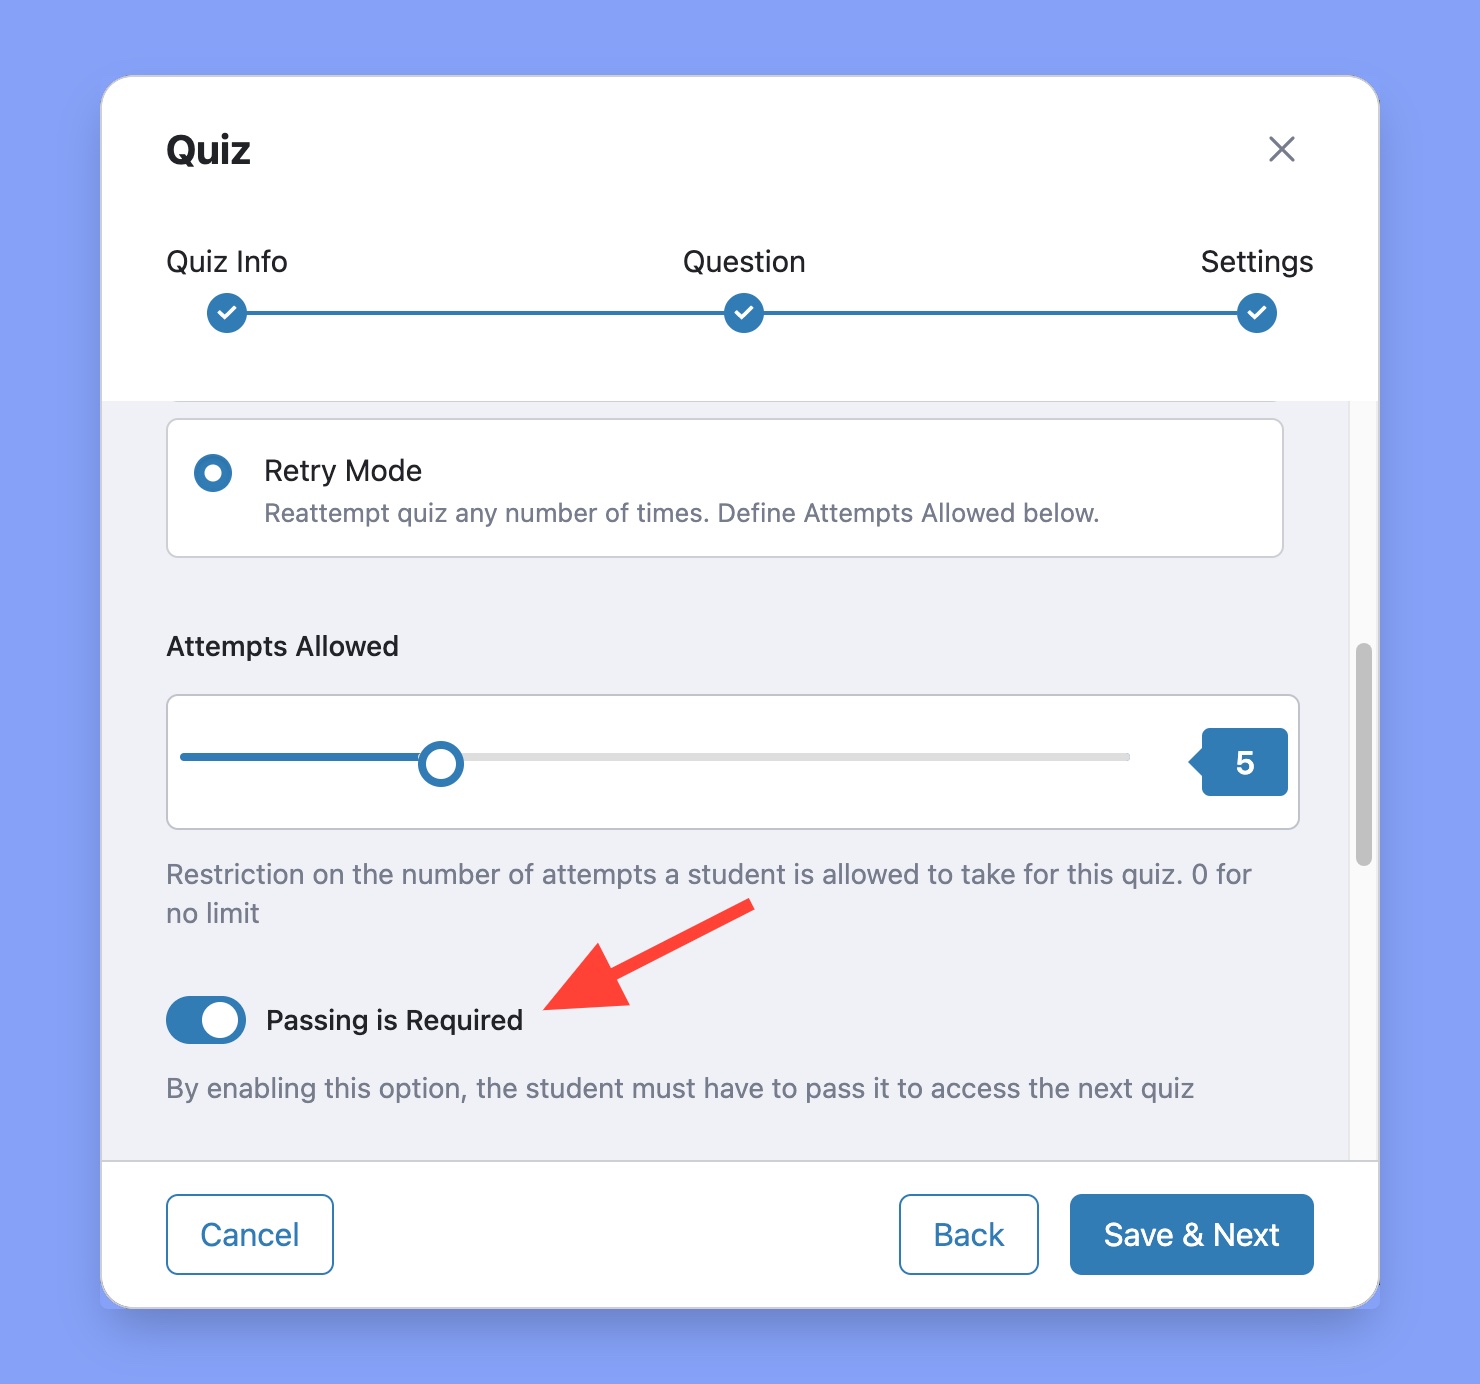
And voila, it’s now mandatory for your students to pass this quiz in order to access the course material that follows!
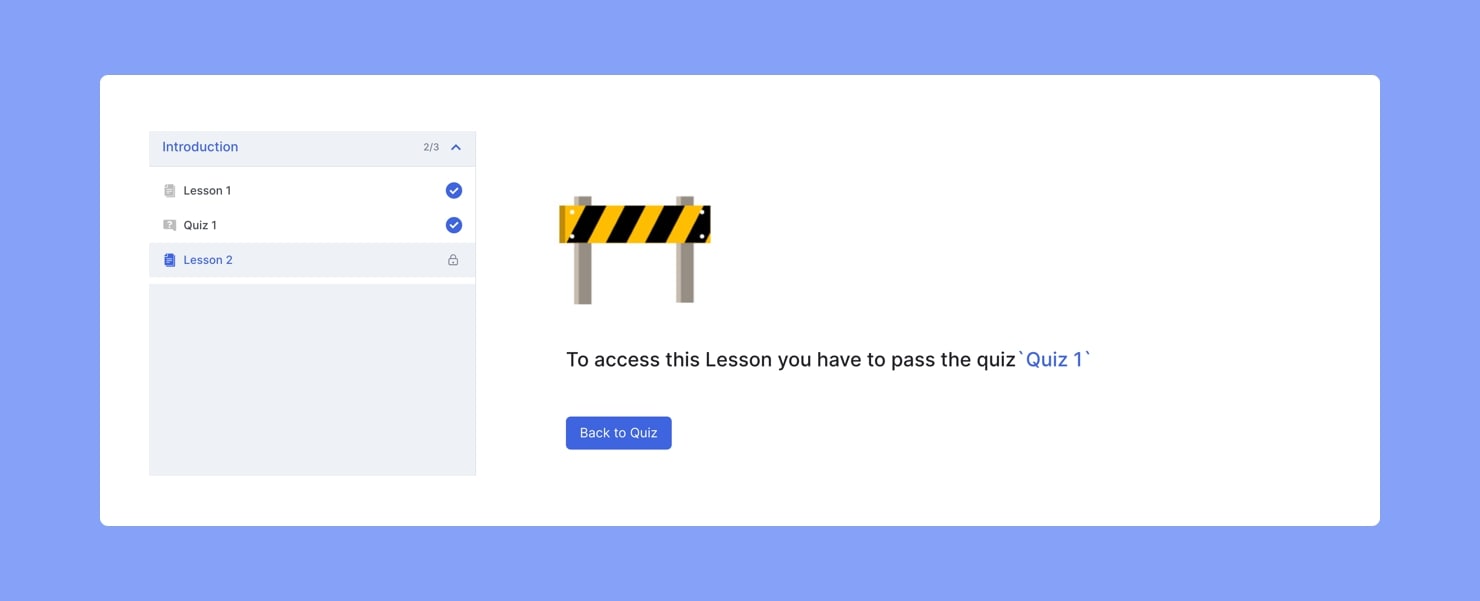
If they fail a quiz that requires passing and attempt to access the next lesson, they’ll now get a message like this:
Add Assignments
Creating a New Assignment
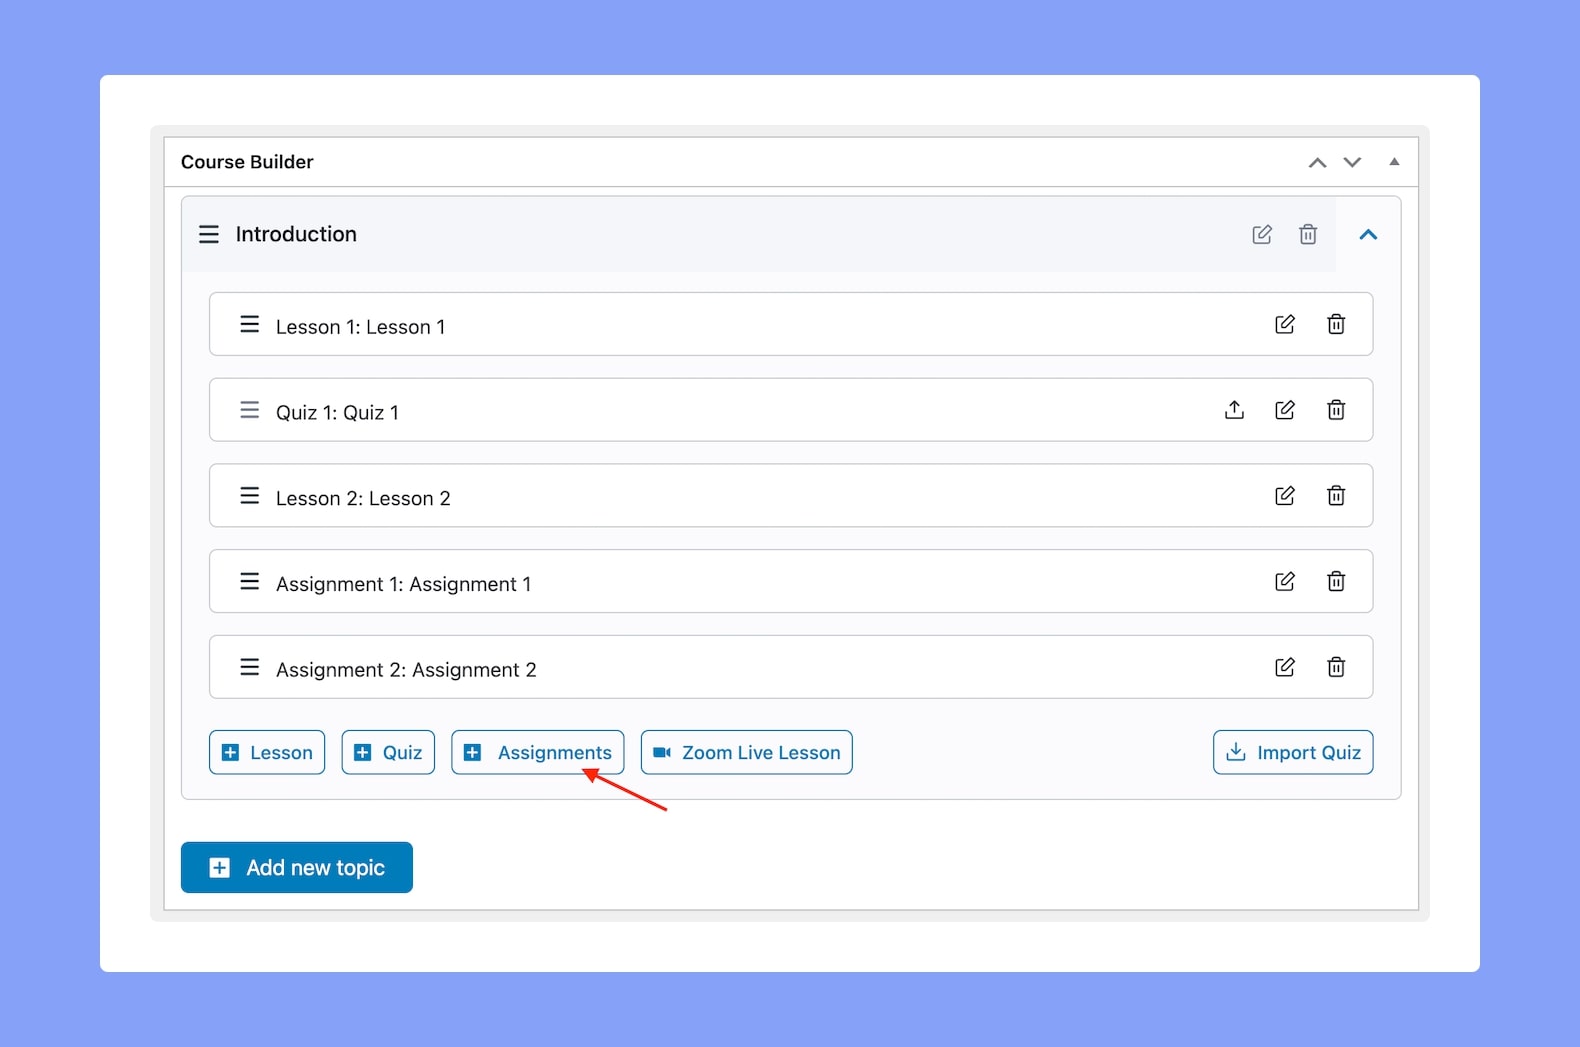
Open any Course in edit mode (or create a new one) and under the Course Builder section open any Topic and you’ll see a button named Assignments.
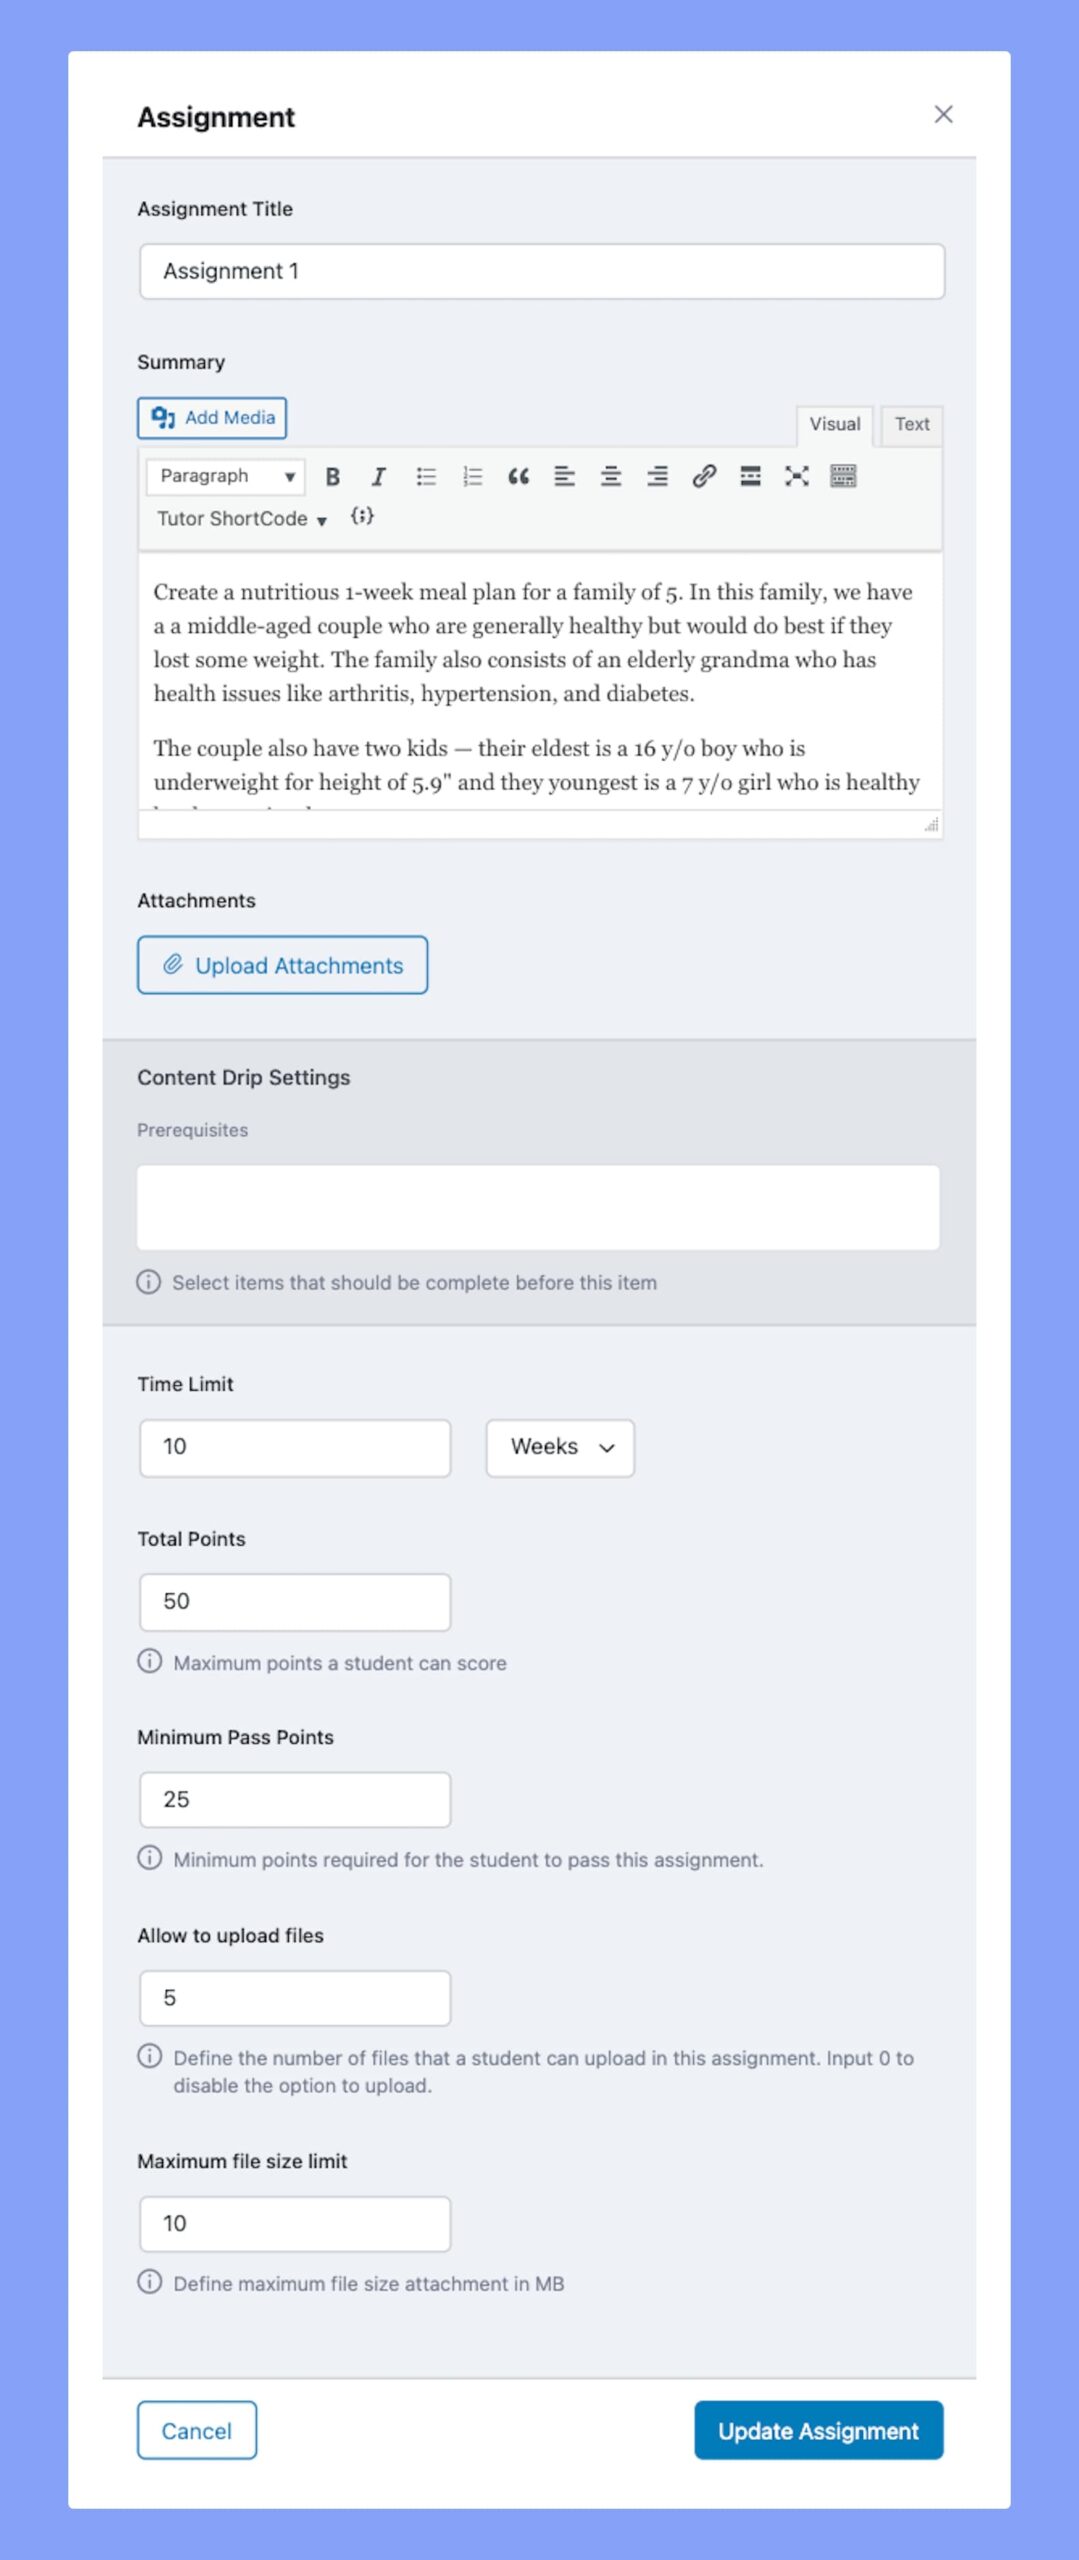
Click on that to create a new Assignment and this will open a new popup window. Here, you can fill in the following necessary information:
Assignment Name: Enter a name for the Assignment.
Summary: Explain the task under the summary field. As this is a text editor, you can use the tools to format the text, add links, and also add media.
Attachments: If you want to provide sample questions, research papers, or any kind of additional instructional resource, you can attach those files by clicking on the Upload Attachments button.
Time Limit: Set the Time Limit of the Assignment. This will be applied as soon as the student views the Assignment on the Course Journey Page. You can set any number starting from zero. Here, zero means no time limit. You can then select a unit from the dropdown beside this field. Options include Weeks, Days, and Hours.
After the time limit is over, the student will not be able to upload any files on the Assignment section nor submit the Assignment.
Total Points: Define the total marks a student can obtain by completing this Assignment here. You can set any number larger than zero.
Minimum Pass Points: Define the minimum mark to be obtained to pass this Assignment. You can set any number larger than zero and smaller than or equal to the Total Points defined earlier.
Allow to Upload Files: Set any number larger than zero if you want to allow the students to upload files. If you don’t want the students to upload any files and just type the text on the submission page then set this to zero.
Upload File Size Limit: Define a File Size Limit (in Megabytes) here for the files students will upload for this Assignment. You can specify any number larger than zero. This field helps restrict the upload of any file that exceeds this limit.
Finally, add this new Assignment to your course by clicking on the Update Assignment button.
Submitting an Assignment
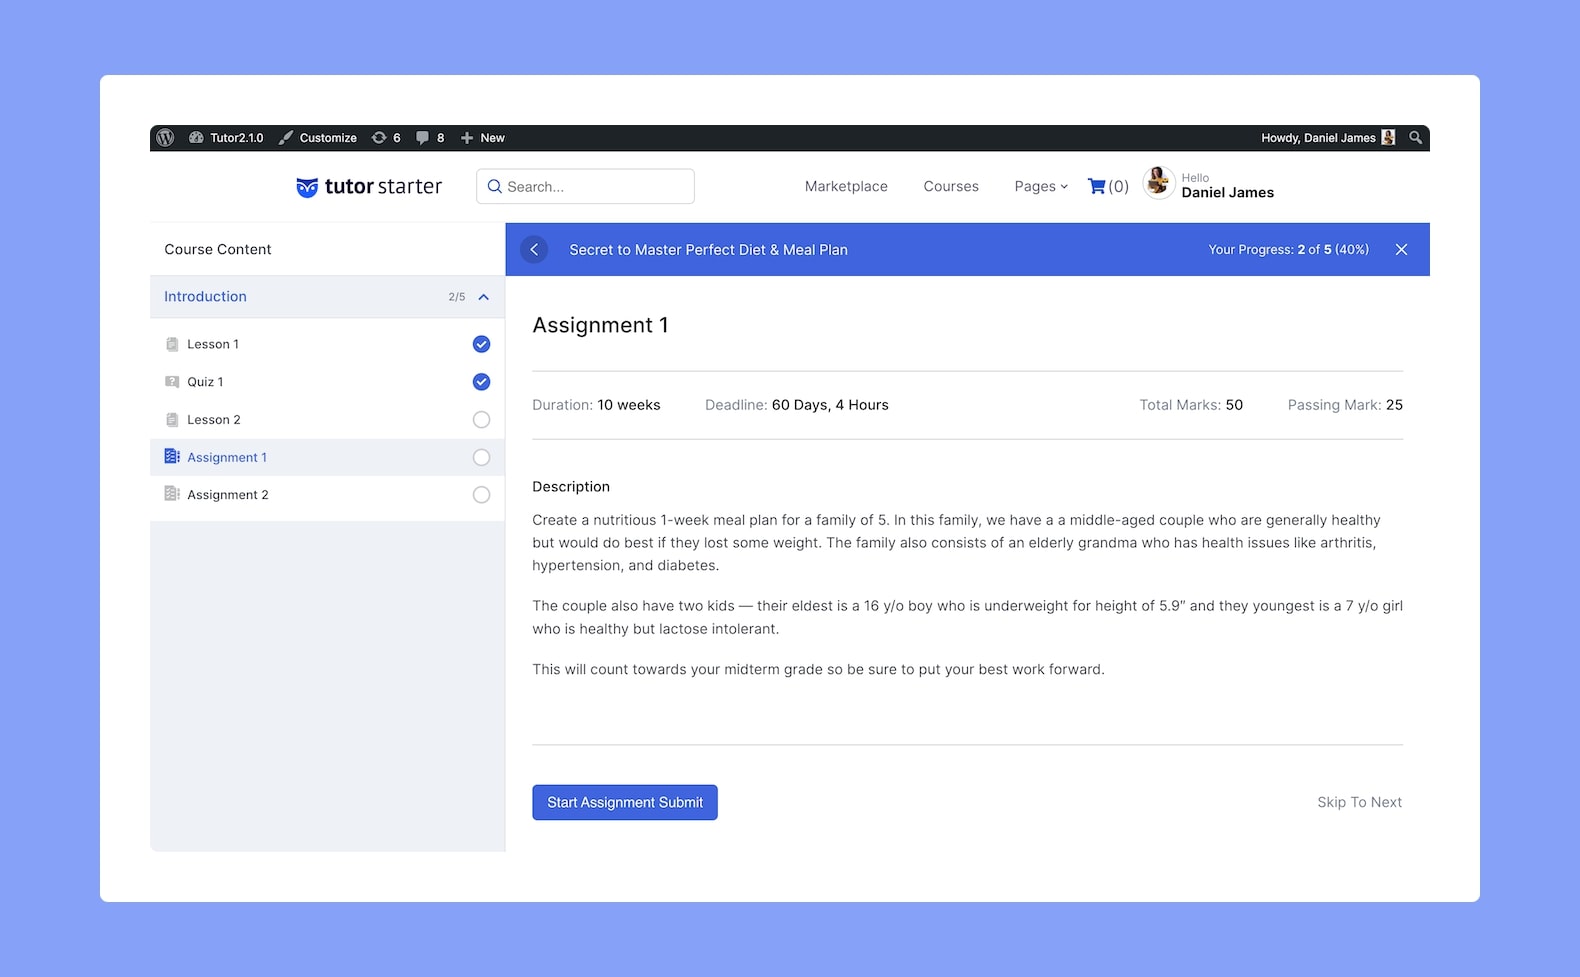
Students will find the Assignment on the Course Journey Page i.e. Lesson View. Here, you’ll be able to see the Assignment Name, Duration, Deadline, Total Marks, Passing Marks, and Description.
To submit an answer, all you have to do is click on the Start Assignment Submit button.
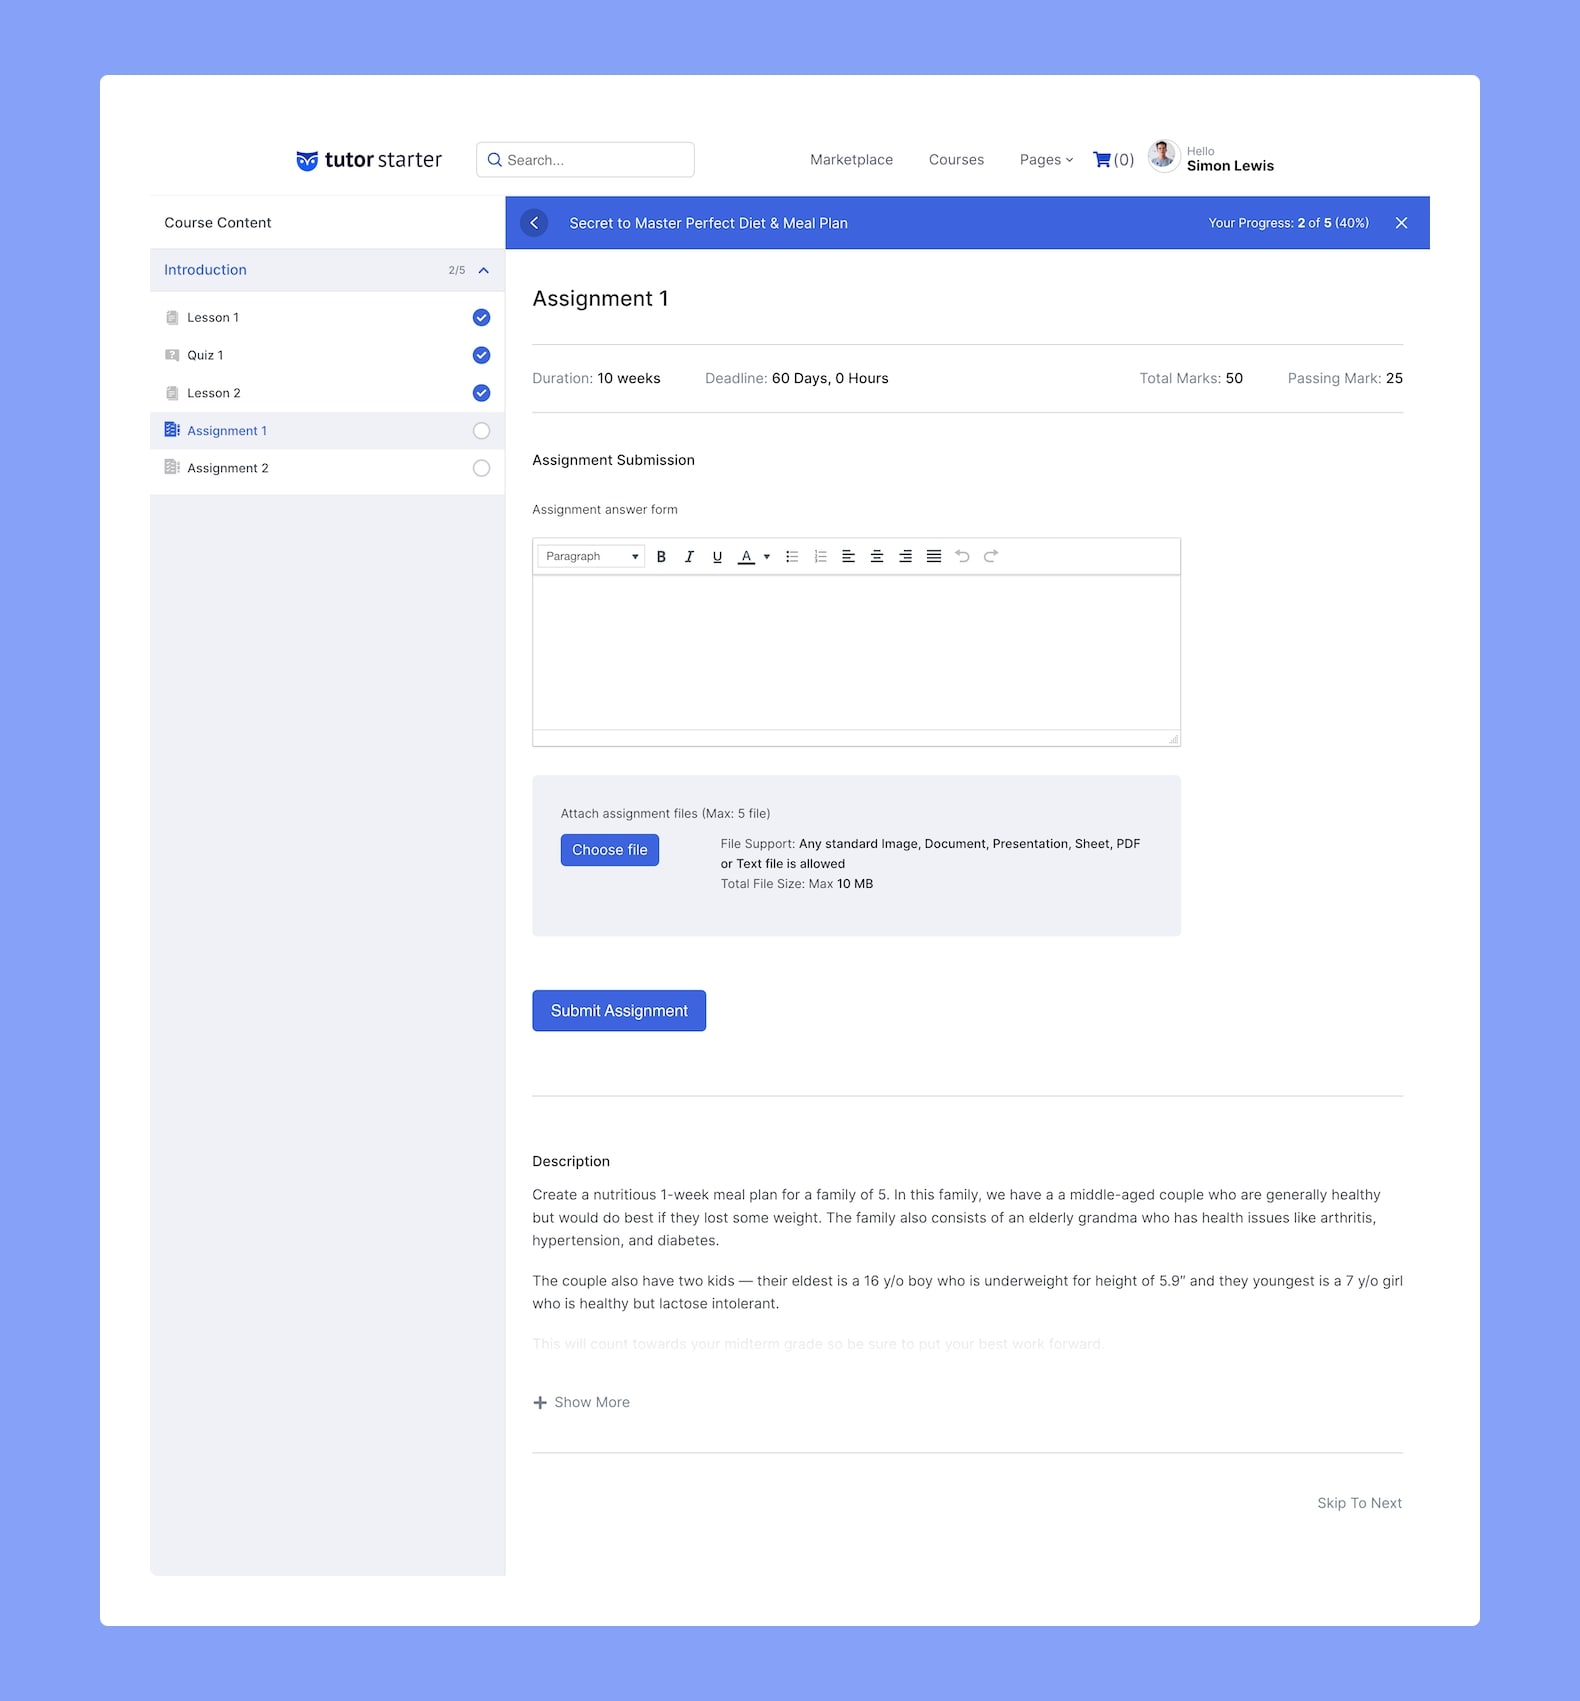
Doing this will take you to an Assignment Submission form that looks as shown in the image above. Here, you can enter your answer text in the Assignment Submission field and click on Choose File button to open the File Manager and select the file you want to upload.
Finally, you can finish off your submission by clicking on the Submit Assignment button. Your page will reload and a new table will appear listing the Date of submission, Total Marks, Pass Marks, Earned Marks, and the Result.
If the submission is not yet evaluated, then the earned marks column will be blank and the result will be Pending.
Viewing and Evaluating Assignments
Here, you’ll find all the submitted assignments listed with details like Assignment Name, Student, Total Points, Minimum Pass Points, Duration, and Star & End Dates.
You can click on the Evaluate button to see and evaluate the submitted answers or use the Delete button to remove a submission.
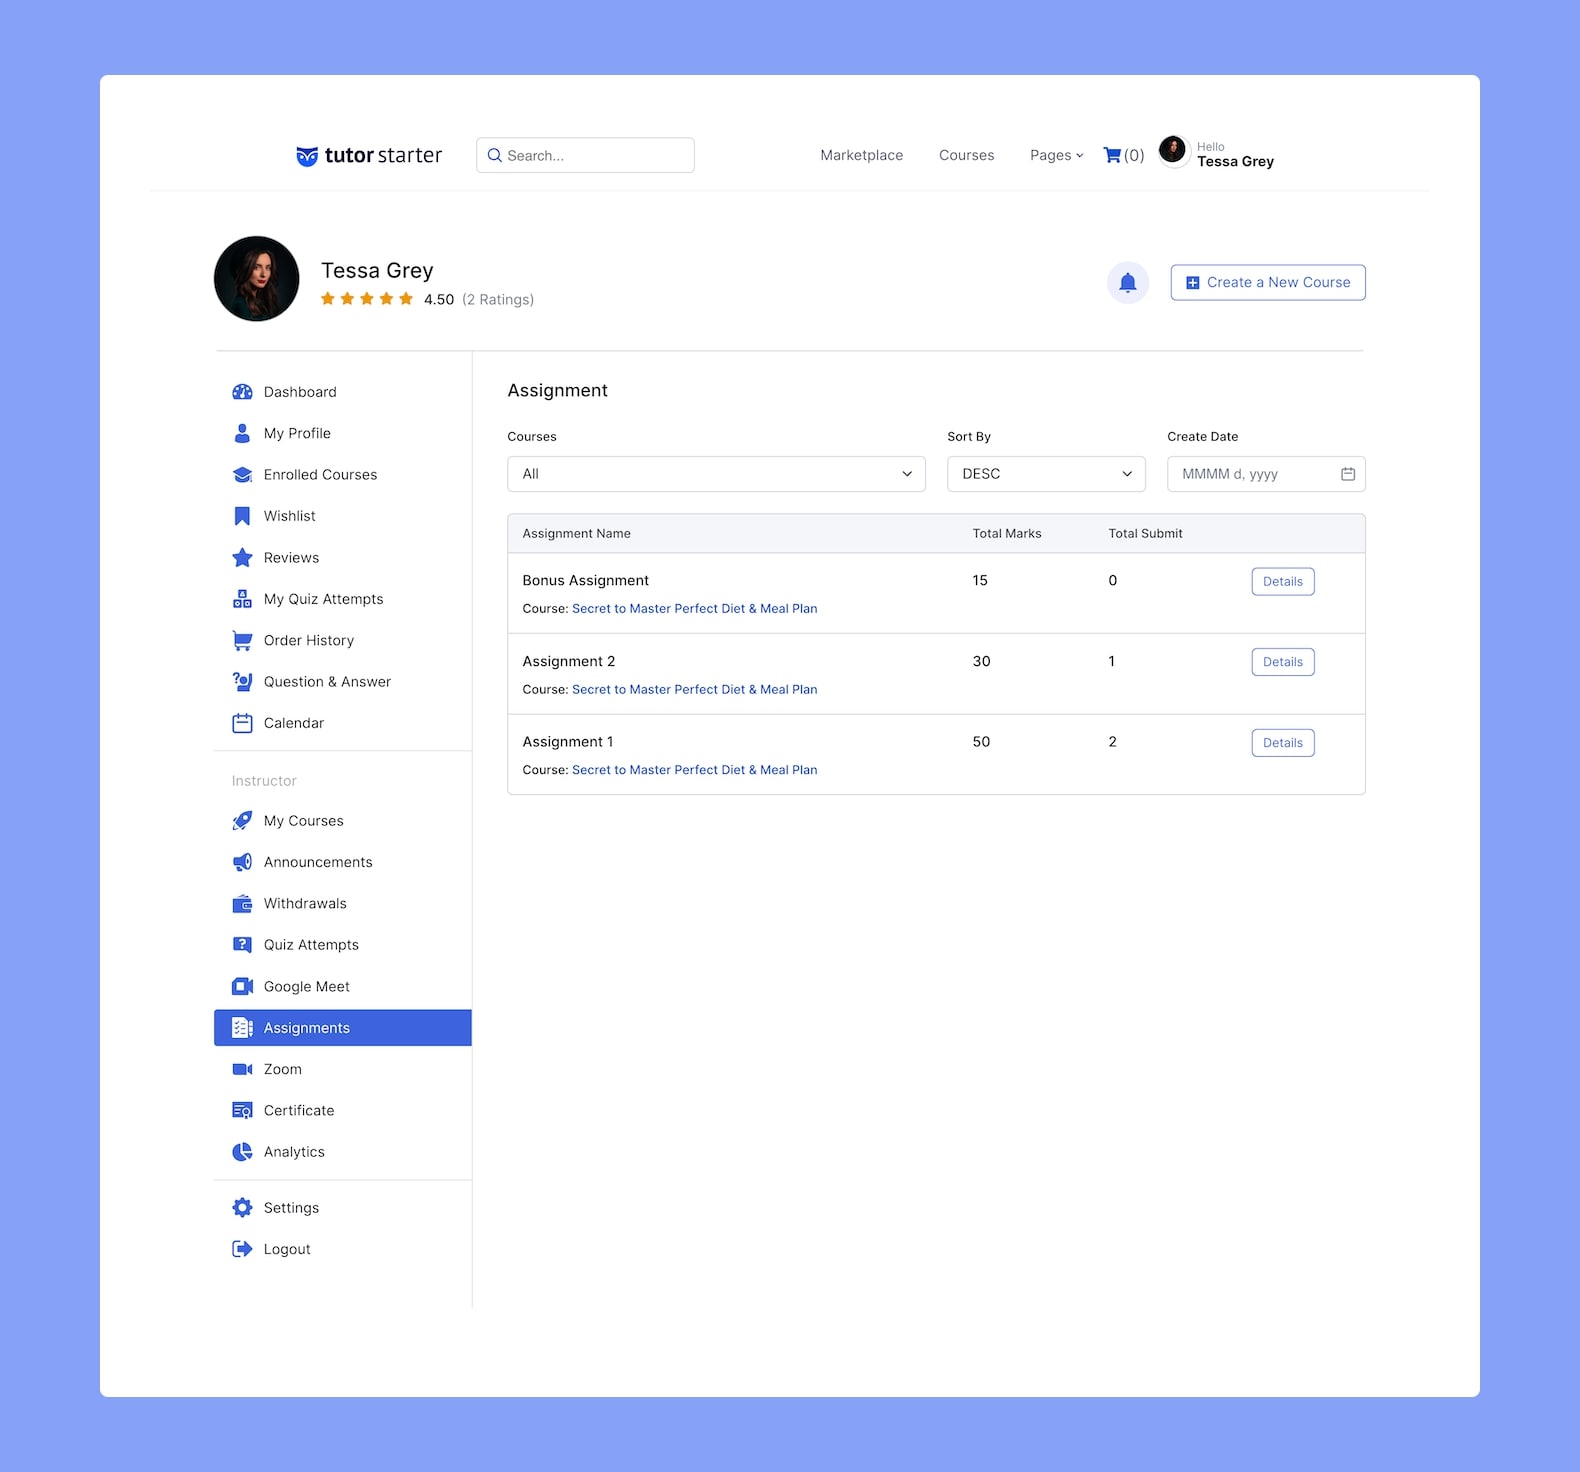
To view all Assignments you can go to Dashboard > Assignments.
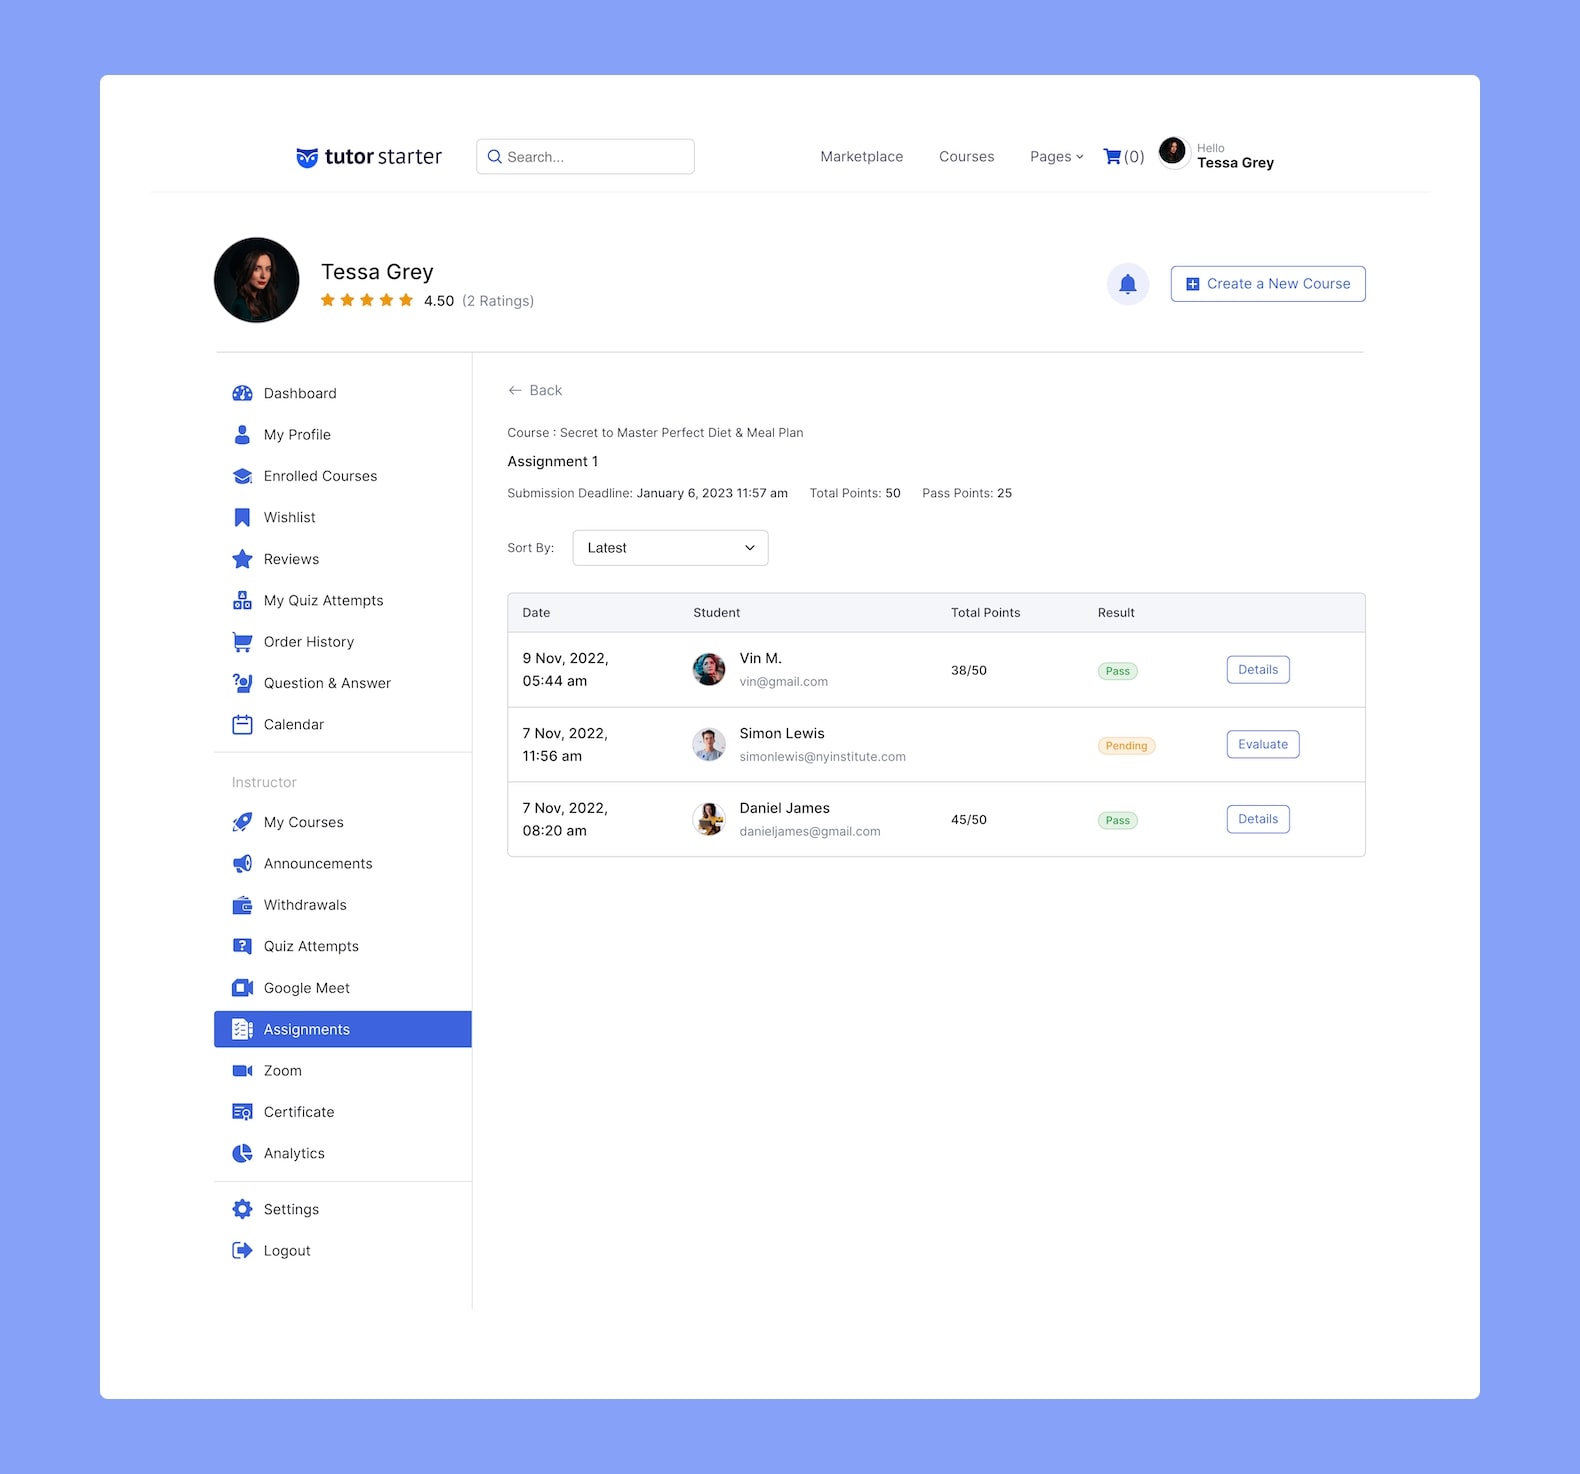
Then, simply click on the Details to see the submissions if any. There, you can click on Evaluate again to evaluate a submitted assignment.
Evaluating Assignments
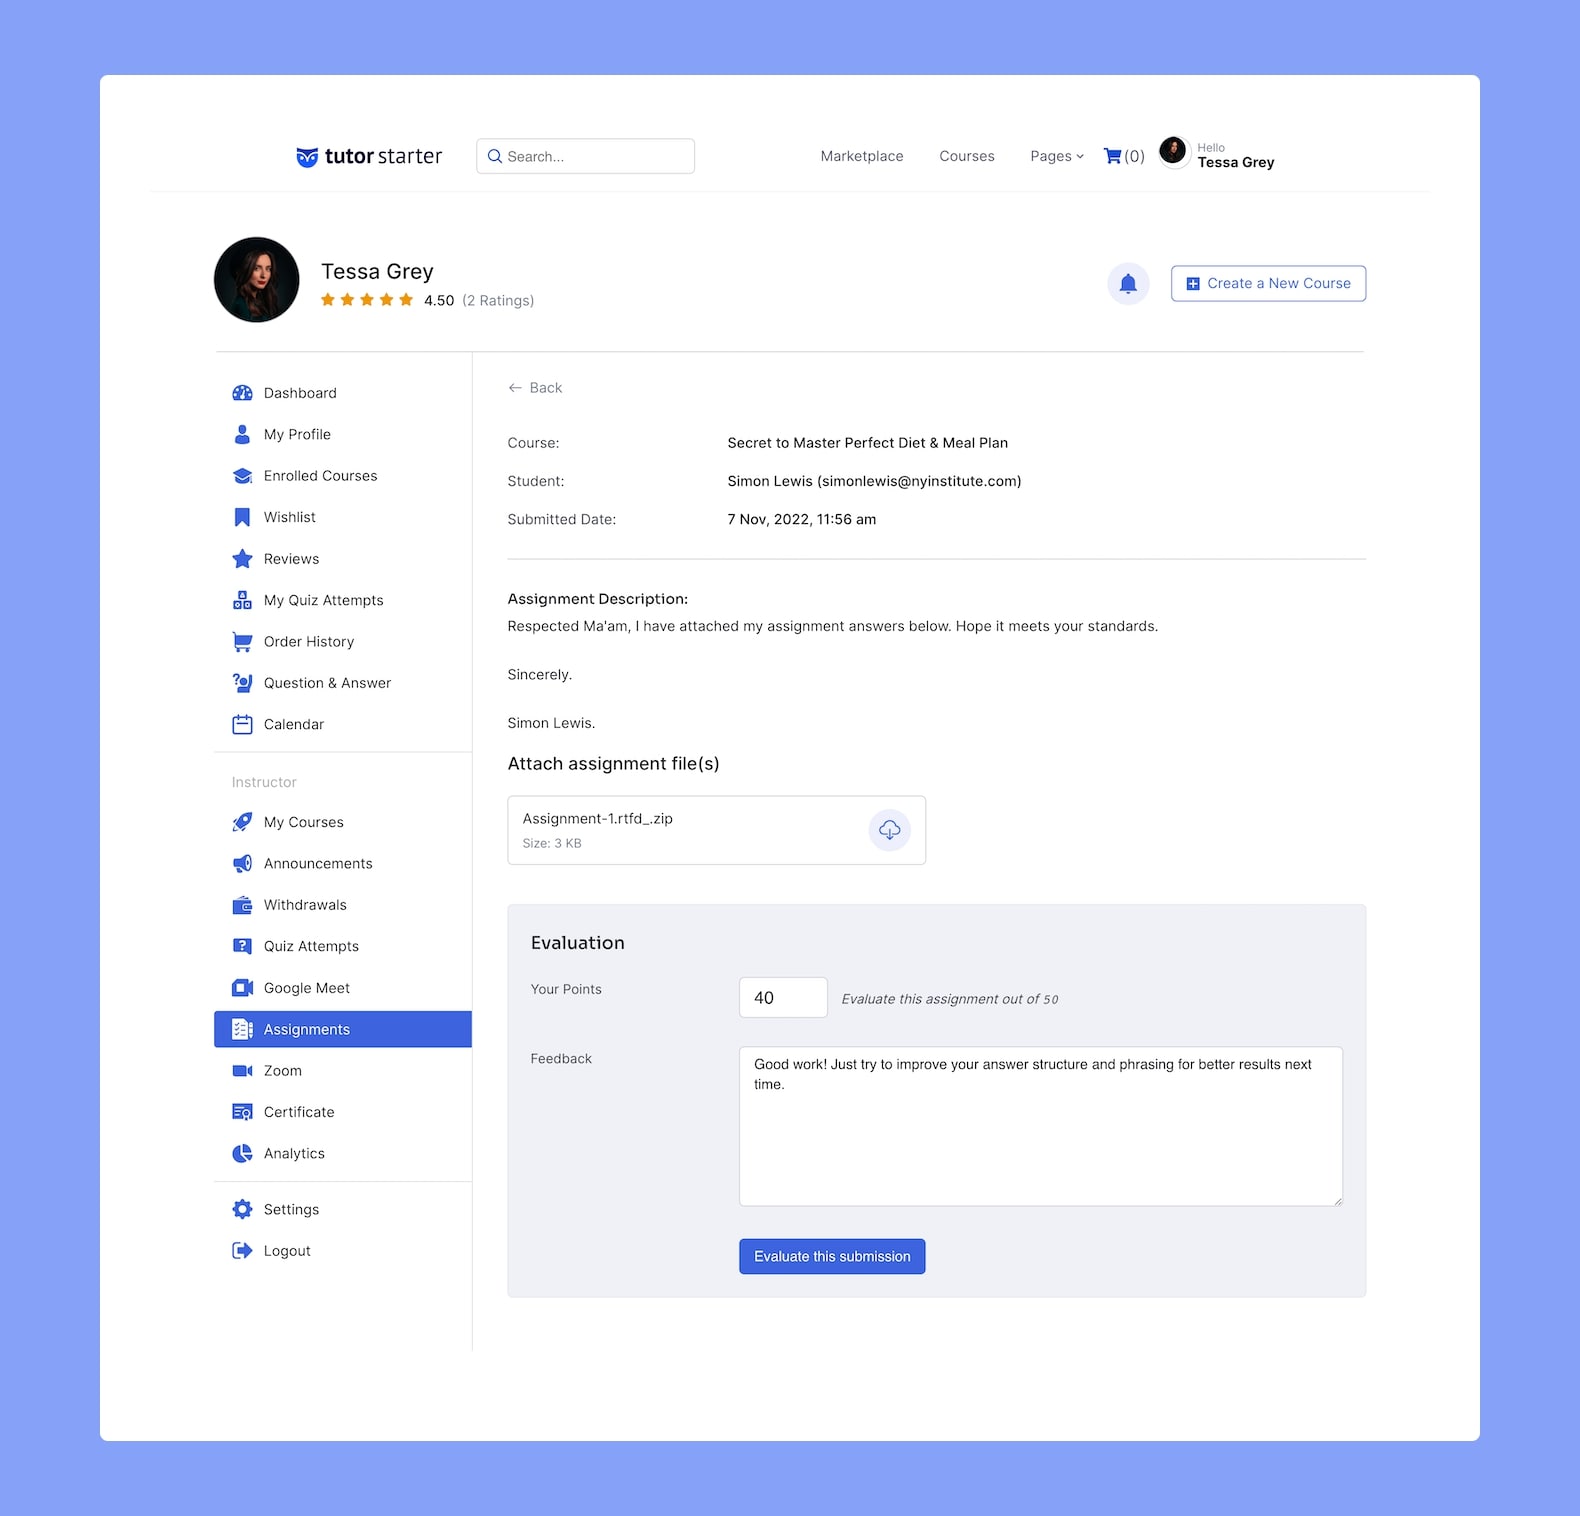
You can also go to your site’s Dashboard > Assignments and click on Evaluate.
Once you’ve entered the Assignments Evaluation Panel, you’ll first be greeted with basic details about the Assignment like Course Name, Student Name, and Submitted Date.
Then, you’ll find the student’s typed answer in the Assignment Description section followed by the files they uploaded which you can download and view by clicking on the download icon.
Lastly, you can submit your Evaluation of the Assignment by filling in the Evaluation Form.
Your Points: Enter the total points you want to award for this assignment. The tooltip beside this field will let you know what the Total Points are for this assignment and you can award anything between 0 and this number.
Feedback: You can use this field to share your thoughts on this Assignment.
To finish off, submit your evaluation by clicking on the Evaluate This Submission button.
Add Live Lessons
Creating a Zoom Meeting

Scroll down to the Zoom Meeting section and click on the Create a Zoom Meeting button.
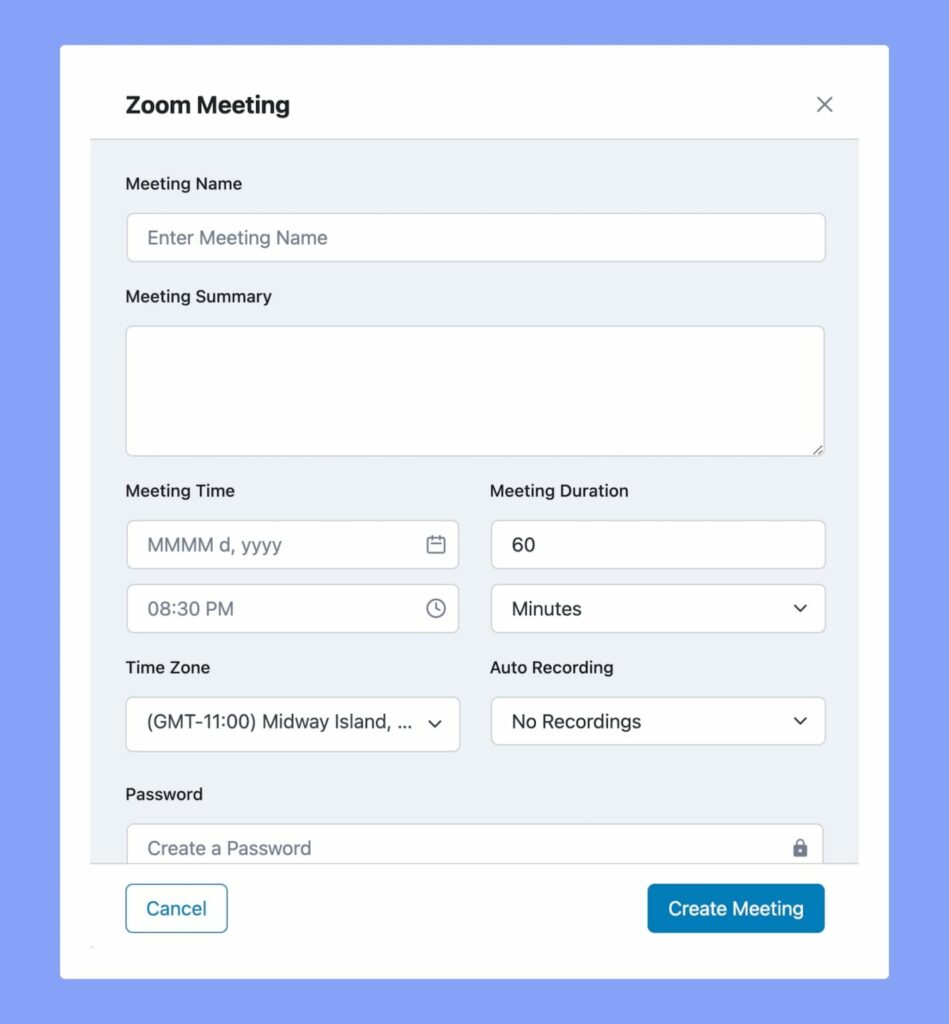
This will open the Zoom Meeting form where you can fill in the following meeting details:
Meeting Name: Give the meeting a name.
Meeting Summary: Give a summary of what the meeting is about. Mention things such as topics to be covered, type of meeting, etc.
Meeting Time: Select the time and date of the meeting.
Meeting Duration: Select the duration of the meeting. Keep in mind that if you are a free user of Zoom, you cannot hold meetings longer than 40min.
Time Zone: Specify the time zone for the meeting.
Auto Recording: Specify the Recording type of the meeting. Local will store the meeting on a user’s PC while Cloud will use Zoom Cloud Storage. You can also select No Recording to simply disable this option.
Password: Set a password that will restrict people from accessing the meeting randomly. Only the students with the proper credentials will be able to access the Zoom meeting.
Meetings Host: This section will display the name of the meeting host.
Finish off by clicking on the Create Meeting button. You’ll then see this meeting appear under All Meetings in the Zoom Panel.
Creating a Live Lesson
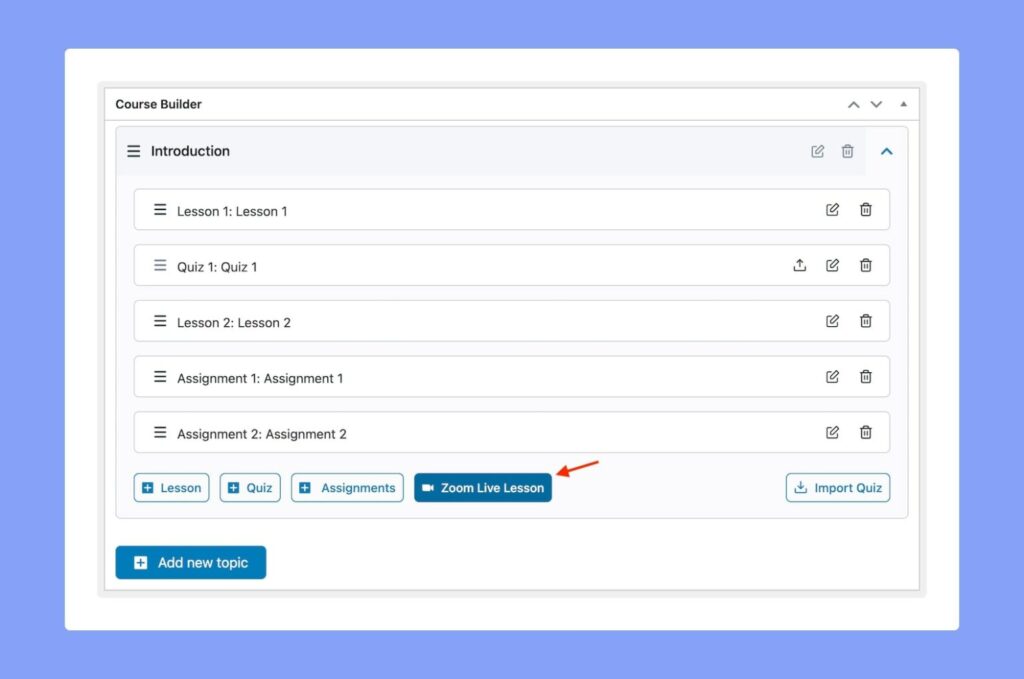
Alternatively, you can also create topic-specific live sessions by going to the Course Builder section. Here, expand the topic of your choice and click on the Zoom Live Lesson button to open the live lesson form. Here, you can fill in the same details discussed earlier.
Meeting Name: Give the live lesson a name.
Meeting Summary: Give a summary of what the lesson is about. Mention things such as topics to be covered, type of lesson, etc.
Meeting Time: Select the time and date of the live lesson.
Meeting Duration: Select the duration of the live lesson. Keep in mind that if you are a free user of Zoom, you cannot hold sessions longer than 40min.
Time Zone: Specify the time zone for the live lesson.
Auto Recording: Specify the Recording type of the live lesson. Local will store the lesson on a user’s PC while Cloud will use Zoom Cloud Storage. You can also select No Recording to simply disable this option.
Password: Set a password that will restrict people from accessing the live lesson randomly. Only the students with the proper credentials will be able to access the Zoom live lesson.
Meetings Host: This section will display the name of the live lesson host.
As usual, finish off by clicking on the Create Meeting button.
Course Attachments
Course attachments refer to supplementary resources that can be utilized in your courses. These resources may include practice files, example files, and other essential documents. You can upload these attachments in this section, and they will be conveniently accessible for students to download under the “Resources” tab on the Course Details Page.

Adding Instructors
You also have the privilege of assigning multiple instructors to your course. To assign an instructor, you can easily click on the “Add Instructors” option and search for them by name.

Additional Data
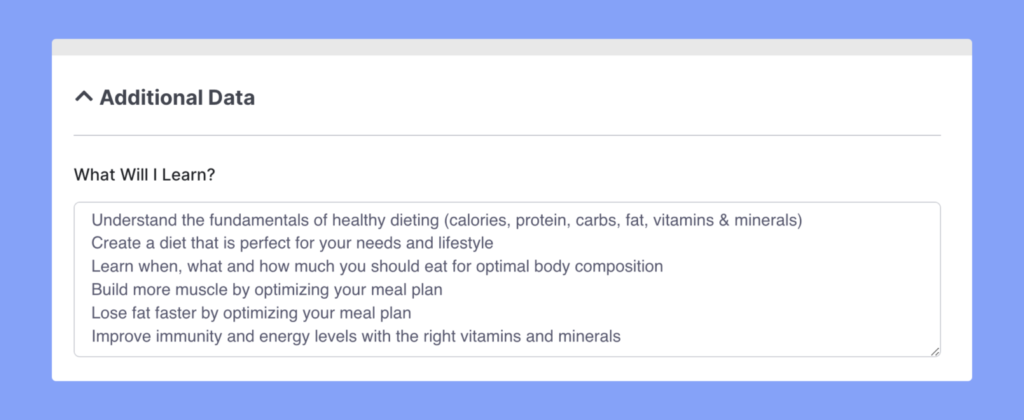
The following data acts as informative data for potential students while also acting as marketing material for your course.
What Will I Learn
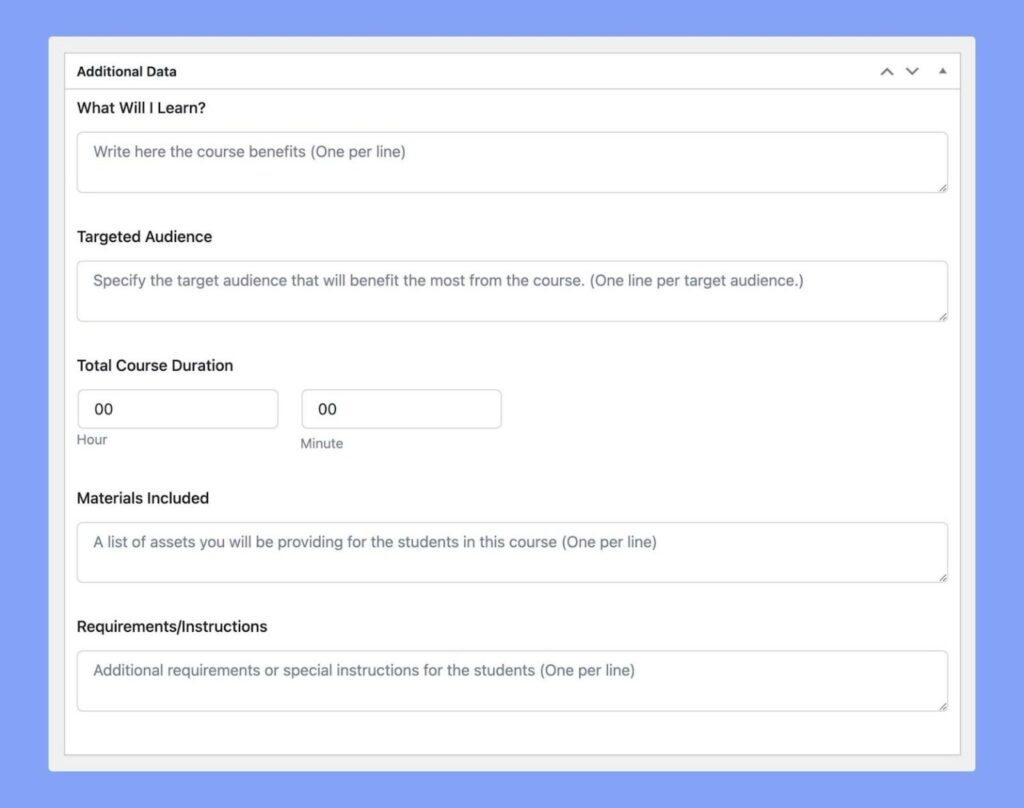
List the knowledge and skills that students will learn after completing this course. (One per line)
Target Audience

Specify the target audience that will benefit the most from the course. (One line per target audience)
Course Duration

Please indicate the total duration of the course, which refers to the estimated time it typically takes for a student to successfully complete the course.
Materials Included

Please provide a list of the assets that you or the instructors will be offering to the students enrolled in this course. Please list each asset on a separate line.
Requirments

Add any additional requirements or special instructions for the students. (One per line).
Course Tag
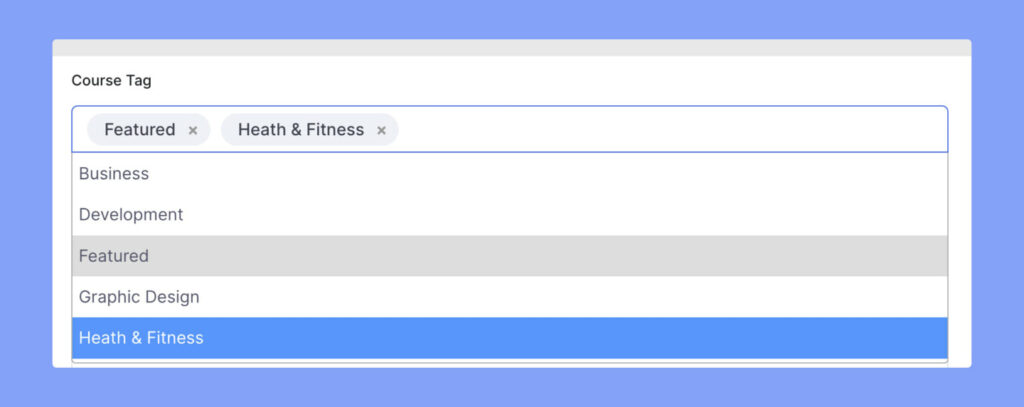
Select related tags for this course.
Course Prerequisites

Prerequisites are courses that need to be finished before gaining access to a specific course. The purpose of these prerequisites is to guarantee that students possess the essential foundation and knowledge required to successfully complete the course and derive the maximum benefit from it.
For instance, if you have two courses named “Basics of Programming Languages” and “Advanced Programming Languages,” you can establish “Basics of Programming Languages” as a prerequisite for the “Advanced Programming Languages” course. This ensures that students have a comprehensive understanding of the fundamentals before delving into more intricate topics.
Certificate Template
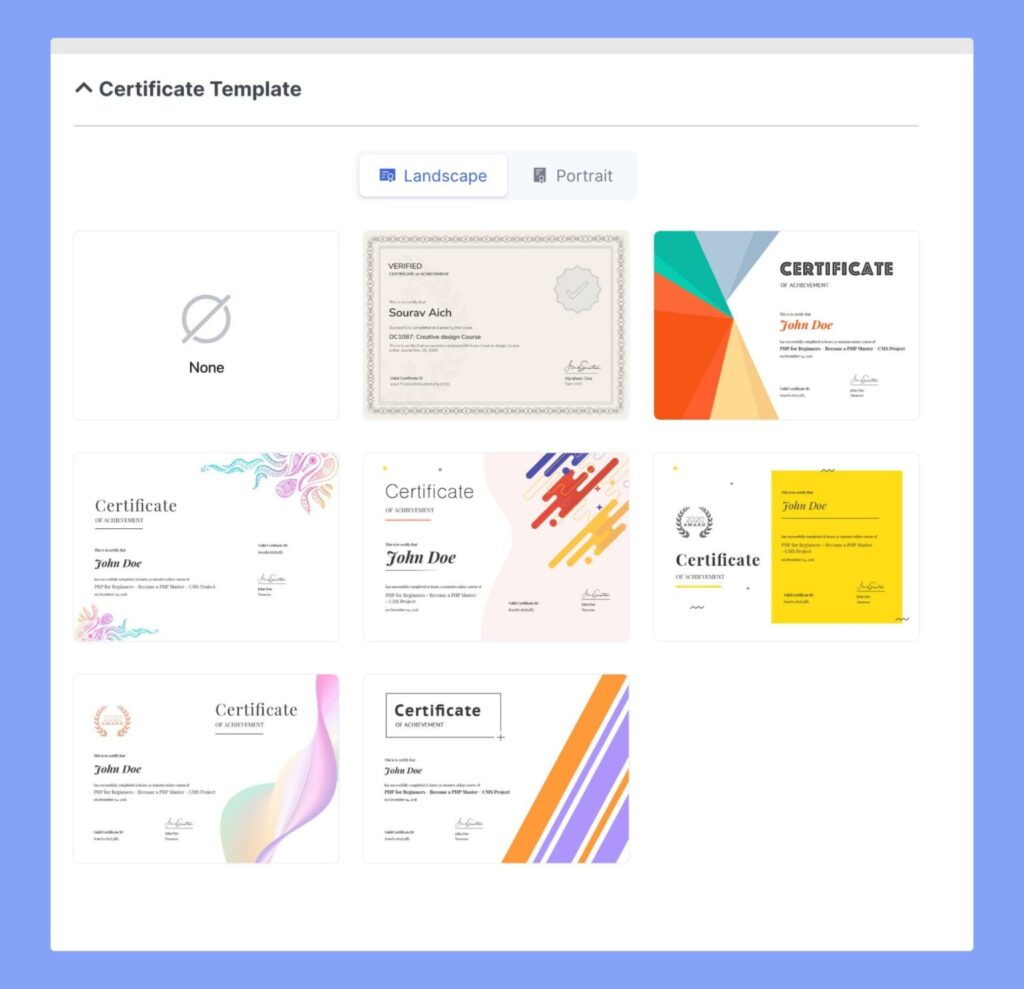
Within the Certificate Template section, you have the option to choose a template that will be utilized for generating certificates awarded to students upon course completion.
Course Info

Let’s start with the “Course Info” section. In this section, you will find the following fields to complete:
Course Title: When creating your course, it is crucial to select an appropriate title. The title should accurately represent the course content, so aim for brevity and catchiness. Additionally, including relevant keywords in the title can enhance visibility.
Course Slug: In this section, you have the option to modify the Course Slug. The Course Slug appears in the URL after the final backslash. To improve your course’s visibility in search engine results, it is essential to ensure that the Course Slug is relevant, includes relevant keywords, and separates each word with hyphens.
About Course: Utilize this field to provide potential students with a general overview of what they can expect from the course. Describe the course content, learning objectives, and provide a brief summary of the syllabi.
Course Settings
You have the ability to update the fundamental course settings and content drip options within this section. Let’s provide an explanation for both of these.
General
In this section, you have the ability to customize certain attributes of your course.

Maximum Student: This field enables the user to specify the maximum enrollment limit for a course. If the “Maximum Students” is set to 0, there will be no restriction on the number of students who can enroll in the course.
Difficulty Level: The difficulty level settings for course enrollment allow instructors to categorize the course into different levels of complexity, facilitating students in selecting the appropriate course based on their skill level. The four main levels are as follows:
All Levels: This option indicates that the course is suitable for students of all skill levels, ranging from beginners to experts.
Beginner: This option is intended for courses designed for students with minimal or no prior knowledge of the subject. These courses aim to provide a solid foundation for further study.
Intermediate: This option is for courses targeted at students who possess some knowledge of the subject and seek to deepen their understanding. These courses assume a basic understanding and build upon it.
Expert: This option is designed for courses tailored to students with advanced skills and extensive knowledge in the subject. These courses assume a high level of understanding and aim to challenge students and enhance their skills further.
Public Course: The Public Course option is a setting that makes an online course accessible to anyone for enrollment. It means that the course can be accessed by anyone who has the course page link, without requiring them to log in or have an account to view the course content.
Q&A: This option enables instructors to activate a Question and Answer section for the selected course.
Choose Course Category
The option “Choose Course Category” enables you to classify your online course into specific topics or areas of study. This assists in the organization and grouping of similar courses, simplifying the search process for students and helping them find courses that align with their requirements more easily.

Set Course Price
The “Set Course Price” section allows you to choose whether the course will be free or paid.

If the course is paid, you have the option to set both a regular price and a discounted price. This section allows you to determine the cost for enrolment in the course.
Set Course Thumbnail
In the “Set Course Thumbnail” section, course creators can incorporate a primary image or visual representation that represents the course. This image will be displayed on course listings, promotional materials, and other pertinent pages. The purpose of the thumbnail is to enhance the visual appeal of the course and provide prospective students with a glimpse of what the course entails.

Course Intro Video
The “Course Intro Video” section allows you to add a video introduction to your online course that will appear on the Course Overview Page. You can choose from multiple video sources, such as HTML5, External URL, YouTube, Vimeo, Embedded, or Shortcode, to include the video in your course.

Course Builder
The “Course Builder” is the core feature of VDR4U, serving as the foundation for creating and structuring course content.
It offers a user-friendly interface for managing course content, allowing you to add, edit, and organize topics, lessons, and quizzes. Additionally, you can utilize this section to personalize essential course details, such as information, settings, and attachments.
This section empowers instructors or administrators to effortlessly construct the framework and content of an online course, making it accessible for students to enroll and participate.

Within VDR4U, a course is structured using topics, each containing lessons, quizzes, and assignments. While it is possible to include multiple lessons and quizzes within a single topic, it is advisable to maintain a recommended range of 2 to 5 lessons and one quiz per topic for optimal outcomes.
Add New Topic
The function of “Add New Topic” enables you to effortlessly generate and structure your course content. By simply providing a name and concise summary for each topic, and utilizing the provided buttons to add lessons and quizzes, you can easily organize your course. The process is intuitive, accompanied by helpful tooltips, ensuring a seamless and streamlined experience.

Add Lesson
To add a new lesson, click on the “+Lesson” button.

In the “Lesson” window, enter a title and description for the lesson and upload a featured image. Then, scroll down to find additional options such as Video Source, Upload Attachment, and more. These options are explained below:

Video Source: You can add the source of the video lesson here. Similar to the Course Intro Video, you can choose from external or internal sources.
Upload Attachments: Upload any necessary materials for this lesson here.
Add Quiz
To get started, navigate into a topic and then click on the +Quiz button.

This will open the Quiz Builder window with its very first section called Quiz Info. Here, give the quiz a Title and add a short summary to let students know what this quiz is about.

To go to the next stage, i.e. Question, simply click on the Save & Next button.
Question Types
At the Question stage, you can start adding questions to the quiz by clicking on the Add Question button. This will take you to the Question form where you must first select the Question Type.

As mentioned earlier, there are a total of 10 question types for VDR4U users. Below is a list of what these types are as well as an explanation of how they work.
True/False

To set up a true/false question, first select your question type as True/False. Then you’ll get the option to choose the answer. Then write your question and choose the answer. Click on the radio button to choose the right answer.
Single Choice
Use the single-choice quiz format if you want to use a multiple-choice question with only one correct answer. To add the options, click on Add an Option and define the answer in the Answer Title, upload an image if needed, and select the display format of your choice.

Finally, click on Update Answer and repeat these steps for the other options. Don’t forget to specify the correct answer at the end.
Multiple Choice

The multiple-choice question is almost similar to the single-choice answer. If you want to list multiple correct answers for a simple question, choose the multiple-choice option. Thus students will get full marks only if they select all of the right answers while answering the question.
Open-Ended
A long answer question type where students can give descriptive answers as this field can have a larger character limit. To define this character limit, go to Quiz Builder > Settings > Advanced Settings and find the Open-Ended/Essay questions answer character limit field.

Short Answer
A Descriptive-type question with a more precise and shorter answer. Instructors can define Character Limit> Settings > Advanced Settings under the Short answer characters limit in Quiz Builder.
Fill In The Blanks
Set a sentence prompting students to fill up the missing blanks with the correct answers.

Here first, enter the question and then click on Add an Option.

Then, type your entire question again under Question Title and replace the blanks with the variable {dash}. Below that field, define your Correct Answers each separated by a vertical bar |. Let’s check an example.

Students will see something like what’s shown in the image above on the frontend when they take the quiz.
Matching

Use this answering category only if you want to set a question pattern where students have to match the answers. To do this, enter your question and click on Add an Option. Enter your answer prompt and its matched answer.
You can also upload an image along with the answer prompt. Finally, select the display format you prefer and repeat these steps to add more options.
Ordering
Set an ordering question where students have to reorder the given text, images, or both in the correct sequence to obtain marks.
Here, click on Add an Option and enter your first answer item under the Answer Title field. Like the previous question types, you can also upload an image to go along with this.
Repeat these steps to add more items and make sure to add them in the right order.

Image Matching
Set a matching type question where students can match an image to the correct text to obtain marks.
To implement this, enter your question, click on Add an Option and upload your image prompt, enter its matched answer and click on Update Answer. Repeat these steps to add more options.
Image Answering
Set an identification type question where students need to answer questions based on images.
Similar to Image Matching, click on Add an Option and upload your image and then enter its corresponding answer. Lastly, click on Update Answer and repeat these steps to add more options.
Question

On the Question Form, add the question text, select the type from the dropdown, and add a description if you want. Following that, are a few settings for each question that you need to understand to best use them:
- Answer Required: Toggle this if you want this question to be mandatory to answer.
- Randomize: Toggle this if you want this question’s order to be randomly shuffled among the list of questions.
- Points for this answer: Use this field to set the points to be awarded for getting this question right.
- Display points: Enable this if you want to display the points on the quiz field.
Add the relevant answer(s) and select the correct answer if required. Once you’re done, click on Add to Questions to save it. Doing this will take you back to the previous window where you’ll see the new question already added.
To add more questions, simply click on the Add a Question button again and repeat the same steps. Once you’re done adding all of the questions, click on the Save & Next button to go to the final stage of quiz building which is Settings.
Settings
In this section, you can use the following settings to adjust the quiz behavior according to your preferences. Let’s explain all of these settings in short:
Time Limit
You can set time limit from here in seconds, minutes, hours, days, and weeks format. Use 0, if you don’t want to set any time limit. Besides, you can also hide the quiz time by toggling the Hide quiz time button.

Quiz Feedback Mode
Decide how you want to provide your students with feedback after they are done taking the quiz. The tooltips give you an idea of what each mode means.

Here, you’ll get three different feedback modes. These are:
- Default: Answers are displayed after the quiz is finished.
- Reveal Mode: Answers are shown after the attempt.
- Retry Mode: Reattempt the quiz any number of times. You can define the number of times students can repeat a quiz using the Attempts Allowed setting.
Passing grade
It specifies the passing grade for this quiz. You can set the passing grade only in the percentage unit.
Max Question Allowed to Answer

This feature is introduced to randomize questions in a quiz. The purpose of this function would be more clear with an example.
This option is a little bit tricky. Let’s have an example. Suppose, you have 50 questions in a quiz, if you put 50 here, a student will have to answer all 50 questions in order to complete the quiz. But if you put 10 here, the student will have to answer only 10 questions out of the 50 and these 10 questions will appear randomly. No student will get the same set of questions.
Advanced Settings

The following are some more Advanced Settings options that you can access by clicking on the Advanced Settings header.
- Quiz Auto Start: Enable this to make the quiz start immediately after the page is loaded.
- Question Layout: Set the layout for the quiz page. Options include Single Question, Pagination, and Question below the other.
- Question Order: Select the order for the questions provided to you. Options include Random, Sorting, Ascending, and Descending.
- Hide Question Number: Select to hide the question number during the quiz.
- Short Answer Character Limit: Select the character limit for short answers.
- Open-ended/Essay Question Answer Character Limit: Select the character limit for open-ended/essay question answers.
Finally, once you’re satisfied with the settings click on Save & Next again to save your quiz. It should appear under your chosen topic on the Course Builder.
To Edit the quiz, simply click on the edit icon that’s on the right side of the quiz listing, and to Delete it, click on the trash icon that’s right beside it.
Make Passing a Quiz Mandatory to Access Next Course Content
- On the Course Builder page, under Course Settings, enable Content Drip and set its type to Course content available sequentially.
- At this point, update the course to ensure this change is applied.
- Next, from Quiz Builder > Settings set the Quiz Feedback Mode as Retry Mode.
- Finally, you should see the Passing is Required toggle appear below the Attempts Allowed slider. All you have to do now is enable this option, click on Save & Next, and Update your course to save the changes.

And voila, it’s now mandatory for your students to pass this quiz in order to access the course material that follows!
If they fail a quiz that requires passing and attempt to access the next lesson, they’ll now get a message like this:

Add Assignments
Creating a New Assignment

Open any Course in edit mode (or create a new one) and under the Course Builder section open any Topic and you’ll see a button named Assignments.

Click on that to create a new Assignment and this will open a new popup window. Here, you can fill in the following necessary information:
Assignment Name: Enter a name for the Assignment.
Summary: Explain the task under the summary field. As this is a text editor, you can use the tools to format the text, add links, and also add media.
Attachments: If you want to provide sample questions, research papers, or any kind of additional instructional resource, you can attach those files by clicking on the Upload Attachments button.
Time Limit: Set the Time Limit of the Assignment. This will be applied as soon as the student views the Assignment on the Course Journey Page. You can set any number starting from zero. Here, zero means no time limit. You can then select a unit from the dropdown beside this field. Options include Weeks, Days, and Hours.
After the time limit is over, the student will not be able to upload any files on the Assignment section nor submit the Assignment.
Total Points: Define the total marks a student can obtain by completing this Assignment here. You can set any number larger than zero.
Minimum Pass Points: Define the minimum mark to be obtained to pass this Assignment. You can set any number larger than zero and smaller than or equal to the Total Points defined earlier.
Allow to Upload Files: Set any number larger than zero if you want to allow the students to upload files. If you don’t want the students to upload any files and just type the text on the submission page then set this to zero.
Upload File Size Limit: Define a File Size Limit (in Megabytes) here for the files students will upload for this Assignment. You can specify any number larger than zero. This field helps restrict the upload of any file that exceeds this limit.
Finally, add this new Assignment to your course by clicking on the Update Assignment button.
Submitting an Assignment

Students will find the Assignment on the Course Journey Page i.e. Lesson View. Here, you’ll be able to see the Assignment Name, Duration, Deadline, Total Marks, Passing Marks, and Description.
To submit an answer, all you have to do is click on the Start Assignment Submit button.

Doing this will take you to an Assignment Submission form that looks as shown in the image above. Here, you can enter your answer text in the Assignment Submission field and click on Choose File button to open the File Manager and select the file you want to upload.
Finally, you can finish off your submission by clicking on the Submit Assignment button. Your page will reload and a new table will appear listing the Date of submission, Total Marks, Pass Marks, Earned Marks, and the Result.
If the submission is not yet evaluated, then the earned marks column will be blank and the result will be Pending.
Viewing and Evaluating Assignments
Here, you’ll find all the submitted assignments listed with details like Assignment Name, Student, Total Points, Minimum Pass Points, Duration, and Star & End Dates.
You can click on the Evaluate button to see and evaluate the submitted answers or use the Delete button to remove a submission.

To view all Assignments you can go to Dashboard > Assignments.

Then, simply click on the Details to see the submissions if any. There, you can click on Evaluate again to evaluate a submitted assignment.
Evaluating Assignments

You can also go to your site’s Dashboard > Assignments and click on Evaluate.
Once you’ve entered the Assignments Evaluation Panel, you’ll first be greeted with basic details about the Assignment like Course Name, Student Name, and Submitted Date.
Then, you’ll find the student’s typed answer in the Assignment Description section followed by the files they uploaded which you can download and view by clicking on the download icon.
Lastly, you can submit your Evaluation of the Assignment by filling in the Evaluation Form.
Your Points: Enter the total points you want to award for this assignment. The tooltip beside this field will let you know what the Total Points are for this assignment and you can award anything between 0 and this number.
Feedback: You can use this field to share your thoughts on this Assignment.
To finish off, submit your evaluation by clicking on the Evaluate This Submission button.
Add Live Lessons
Creating a Zoom Meeting

Scroll down to the Zoom Meeting section and click on the Create a Zoom Meeting button.

This will open the Zoom Meeting form where you can fill in the following meeting details:
Meeting Name: Give the meeting a name.
Meeting Summary: Give a summary of what the meeting is about. Mention things such as topics to be covered, type of meeting, etc.
Meeting Time: Select the time and date of the meeting.
Meeting Duration: Select the duration of the meeting. Keep in mind that if you are a free user of Zoom, you cannot hold meetings longer than 40min.
Time Zone: Specify the time zone for the meeting.
Auto Recording: Specify the Recording type of the meeting. Local will store the meeting on a user’s PC while Cloud will use Zoom Cloud Storage. You can also select No Recording to simply disable this option.
Password: Set a password that will restrict people from accessing the meeting randomly. Only the students with the proper credentials will be able to access the Zoom meeting.
Meetings Host: This section will display the name of the meeting host.
Finish off by clicking on the Create Meeting button. You’ll then see this meeting appear under All Meetings in the Zoom Panel.
Creating a Live Lesson

Alternatively, you can also create topic-specific live sessions by going to the Course Builder section. Here, expand the topic of your choice and click on the Zoom Live Lesson button to open the live lesson form. Here, you can fill in the same details discussed earlier.
Meeting Name: Give the live lesson a name.
Meeting Summary: Give a summary of what the lesson is about. Mention things such as topics to be covered, type of lesson, etc.
Meeting Time: Select the time and date of the live lesson.
Meeting Duration: Select the duration of the live lesson. Keep in mind that if you are a free user of Zoom, you cannot hold sessions longer than 40min.
Time Zone: Specify the time zone for the live lesson.
Auto Recording: Specify the Recording type of the live lesson. Local will store the lesson on a user’s PC while Cloud will use Zoom Cloud Storage. You can also select No Recording to simply disable this option.
Password: Set a password that will restrict people from accessing the live lesson randomly. Only the students with the proper credentials will be able to access the Zoom live lesson.
Meetings Host: This section will display the name of the live lesson host.
As usual, finish off by clicking on the Create Meeting button.
Course Attachments
Course attachments refer to supplementary resources that can be utilized in your courses. These resources may include practice files, example files, and other essential documents. You can upload these attachments in this section, and they will be conveniently accessible for students to download under the “Resources” tab on the Course Details Page.

Adding Instructors
You also have the privilege of assigning multiple instructors to your course. To assign an instructor, you can easily click on the “Add Instructors” option and search for them by name.

Additional Data

The following data acts as informative data for potential students while also acting as marketing material for your course.
What Will I Learn

List the knowledge and skills that students will learn after completing this course. (One per line)
Target Audience

Specify the target audience that will benefit the most from the course. (One line per target audience)
Course Duration

Please indicate the total duration of the course, which refers to the estimated time it typically takes for a student to successfully complete the course.
Materials Included

Please provide a list of the assets that you or the instructors will be offering to the students enrolled in this course. Please list each asset on a separate line.
Requirments

Add any additional requirements or special instructions for the students. (One per line).
Course Tag

Select related tags for this course.
Course Prerequisites

Prerequisites are courses that need to be finished before gaining access to a specific course. The purpose of these prerequisites is to guarantee that students possess the essential foundation and knowledge required to successfully complete the course and derive the maximum benefit from it.
For instance, if you have two courses named “Basics of Programming Languages” and “Advanced Programming Languages,” you can establish “Basics of Programming Languages” as a prerequisite for the “Advanced Programming Languages” course. This ensures that students have a comprehensive understanding of the fundamentals before delving into more intricate topics.
Certificate Template

Within the Certificate Template section, you have the option to choose a template that will be utilized for generating certificates awarded to students upon course completion.